Setting up Email
If your email address ends with @hiwaay.net…
Quick-setup for iOS devices: Use our auto-config link to quickly configure your @hiwaay.net email address on your iOS device (iPhone, iPad, iPod). From a web browser on your Apple mobile device, click the button below…
Information you’ll need: your name, your HiWAAY email address, User Name and Password.
(Only run once per device, please. If you need to configure multiple @Hiwaay.net accounts on your device, use the manual setup steps below for the other accounts.)
![]()
Step-by-Step manual setups for many popular email clients
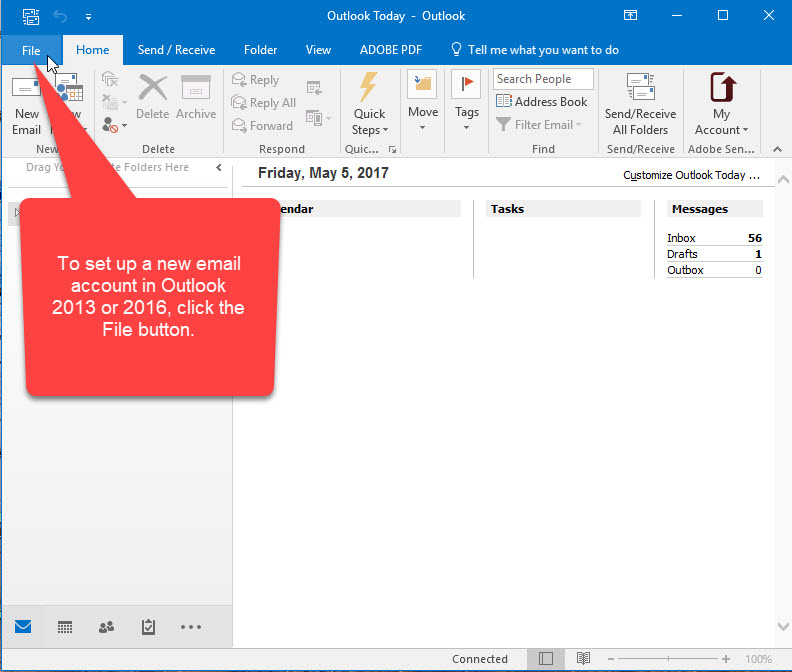
How to Setup Outlook 2013/2016
This guide will show step-by-step instructions for setting up email on Outlook 2013 for Windows. While it can be used for other versions of Outlook, some screens and steps might vary.
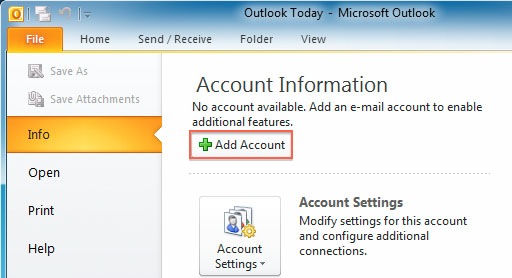
Adding a new account:
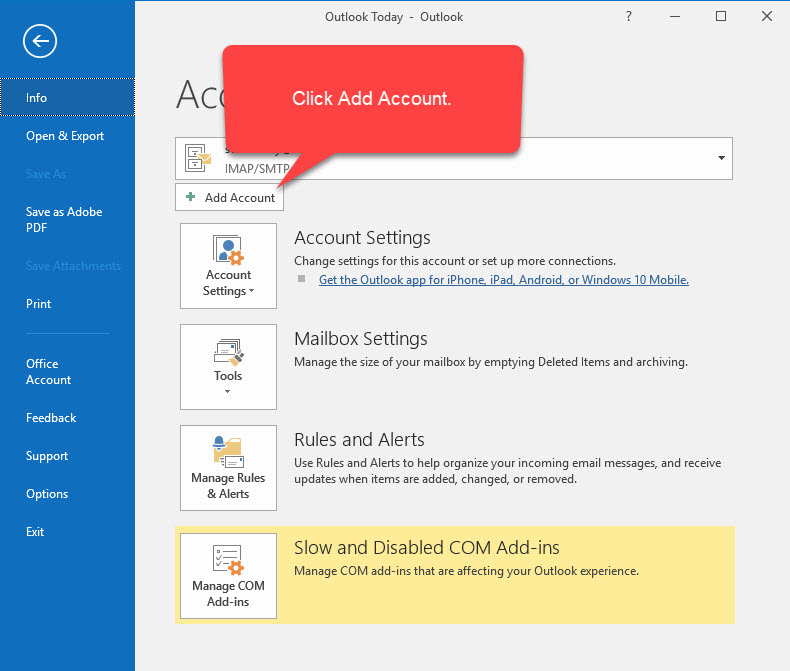
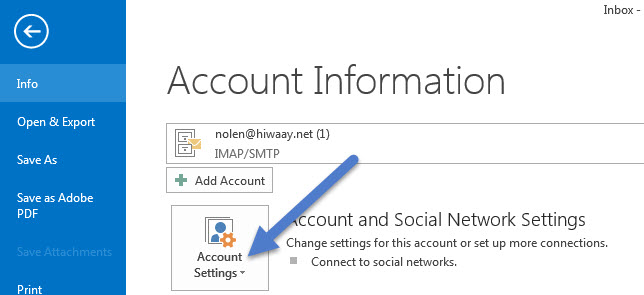
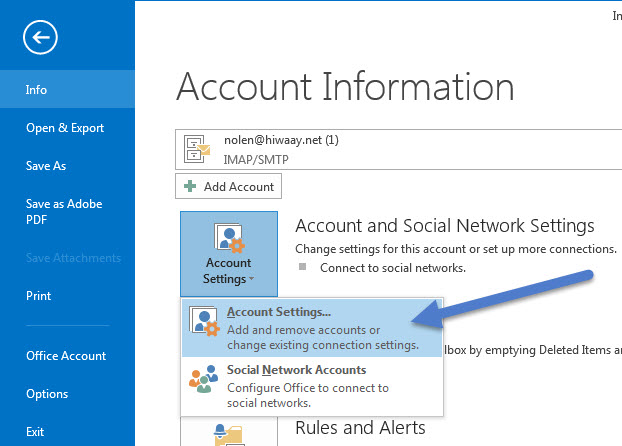
1. Select the File menu and choose Info
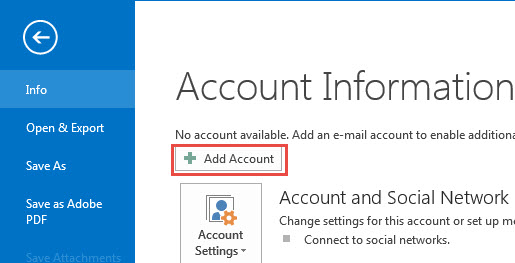
2. Click the Add Account
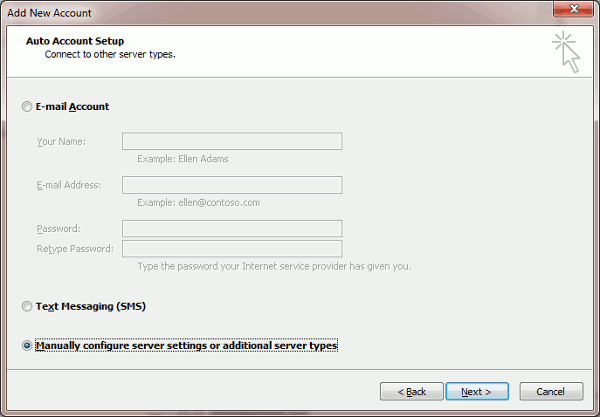
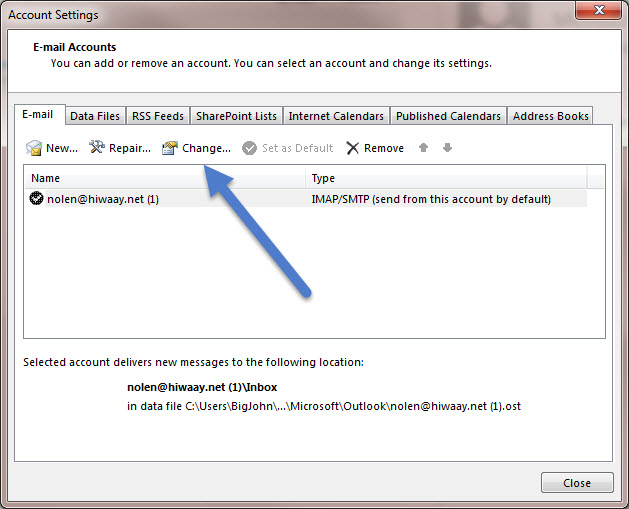
3. Choose Manual setup or additional server types
![]()
4. Click Next.
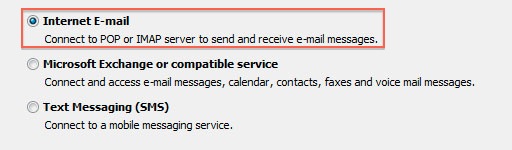
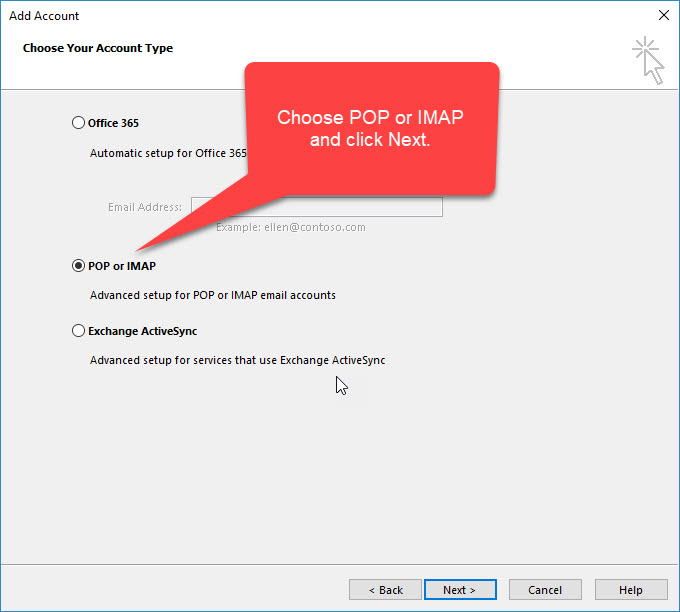
5. Choose POP or IMAP .
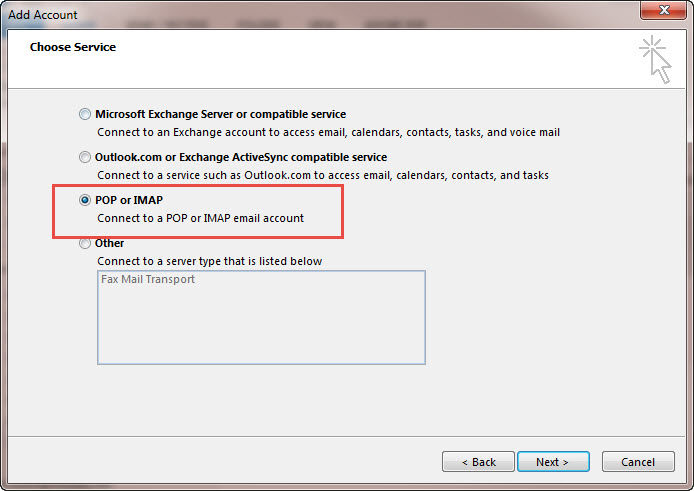
6. Click Next.
Account Settings:
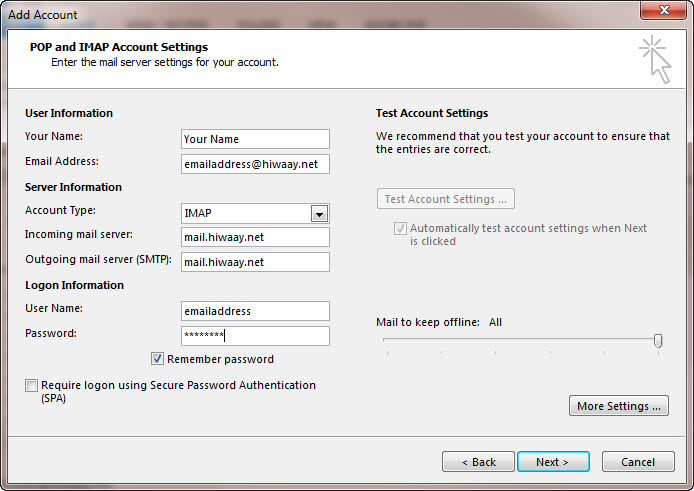
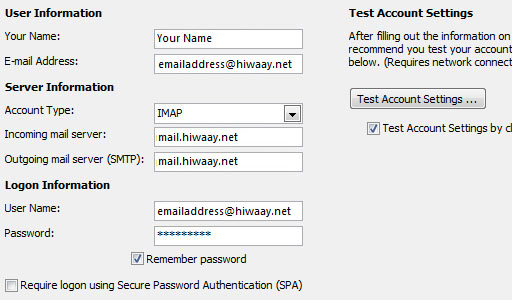
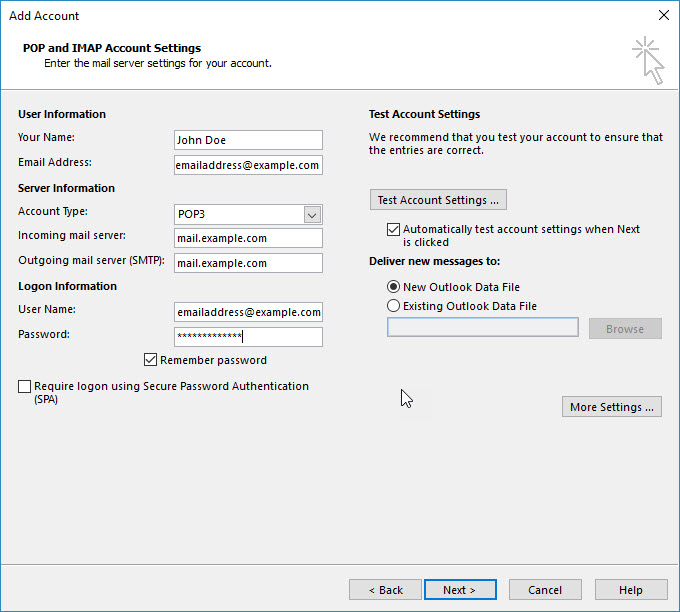
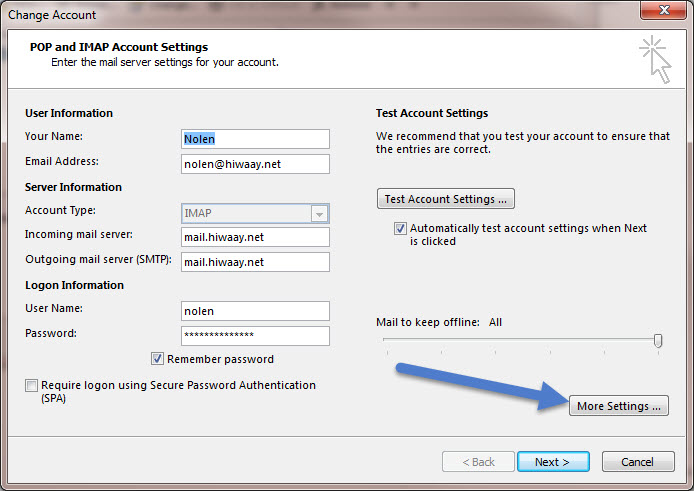
- Enter your Name as you want it to appear on your outbound email messages.
- Enter your full email address.
- Choose either POP or IMAP in the drop-down for ‘Account Type’.
- Enter mail.hiwaay.net as your Incoming Mail Server.
- The Outgoing Mail Server is the same as your Incoming Mail Server.
- Enter your user name (do not include the @hiwaay.net portion).
- Enter your email password.
More Settings
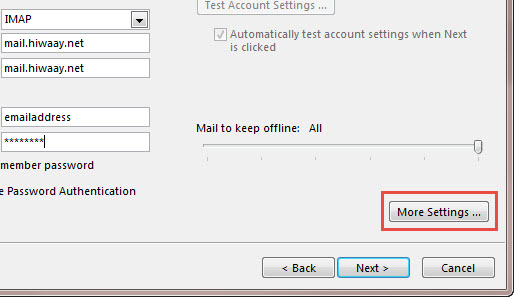
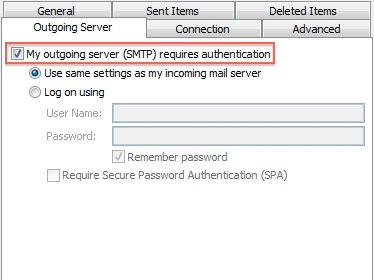
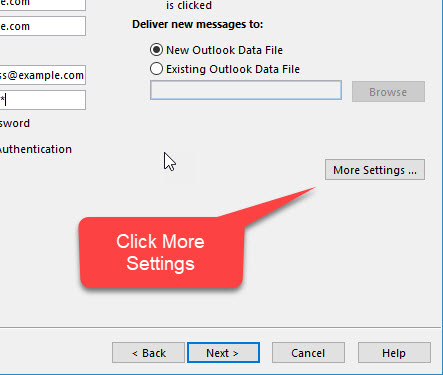
1. Click the More Settings button.
2. Click the Outgoing Server tab.
3. Click the “My outgoing server (SMTP) requires authentication” checkbox.
4. Make sure that it is using the same settings as your incoming mail server.
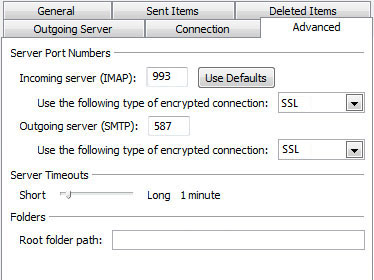
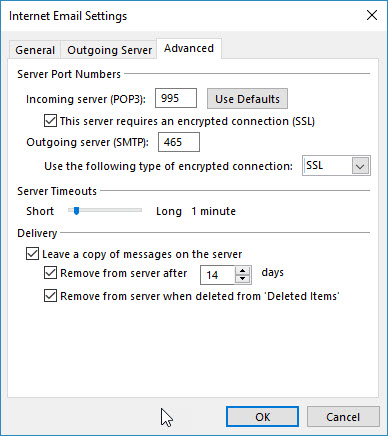
5. Click the Advanced tab.
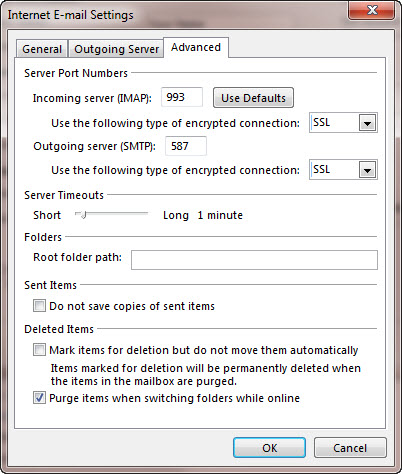
- If you are using POP3 with SSL, please enter 995 for your port. Otherwise leave the port at 110.
- If you are using POP3, you may choose when messages are removed from the server.
- If you are using IMAP with SSL, please enter 993 for your port. Otherwise leave the port at 143.
- If you are using SMTP with SSL, please enter 587 for your port. Otherwise change the port to 25.
6. Click the OK
Completing the Setup
- Click Next on the E-mail Accounts window.
- Click the Finish
Outlook 2013 is now correctly configured to send and receive emails.
Or if you prefer to follow along with a video…
How to Setup Outlook 2010
This guide will show step-by-step instructions for setting up E-mail on Outlook 2010 for Windows. While it can be used for other versions of Outlook, some screens and steps might vary.
Adding a new account:
1. Select the ‘File’ menu
2. Select Info
3. Click the Add Account button
4. Choose Manually configure server settings

5. Click Next
6. Choose Internet E-Mail
7. Click Next
Account Settings
1. Enter your name as you want it to appear on your outbound email messages
2. Enter your full email address
3. Enter your full email address also as the User Name
4. Enter your email password
5. Your mail server is mail.hiwaay.net
6. The Outgoing Mail Server is the same as your incoming mail server
More Settings
1. Click the More Settings button

2. Click the Outgoing Server tab
3. Check the “My outgoing server (SMTP) requires authentication” checkbox
4. Check “use the same settings as your incoming mail server”
5. Click the Advanced tab
6. If you are using POP3 with SSL, click the checkbox and enter 995 as your port. Otherwise leave the default port at 110
7. If you are using POP3, you may choose when messages are removed from the server
8. If you are using IMAP with SSL, click the checkbox and enter 993 as your port. Otherwise leave the default port at 143
9. If you are using SMTP with SSL, click the checkbox and enter 587 as your port. (NOTE: If you are using Windows 7 then you may have to use TLS instead of SSL.)
10. Click the OK button
Testing Settings
1. While on the E-mail Accounts screen, click the Test Account Settings button.
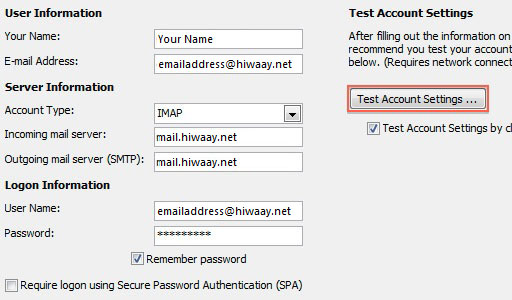
2. This will both check your settings and send a test email to yourself to confirm that everything is working. If you receive any errors, please check your configuration
3. Click the Close button on the Test Account Settings window
4. Click Next on the E-mail Accounts window
5. Click the Finish button
Outlook 2010 is now correctly configured to send and receive emails.
How to Setup Outlook 2007
This guide will show step-by-step instructions for setting up E-mail on Outlook 2007 for Windows. While it can be used for other versions of Outlook, some screens and steps might vary.
Adding a new account:
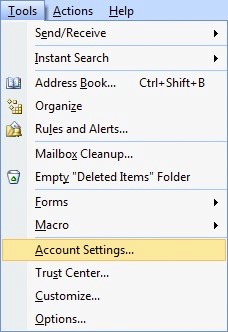
1. Select the ‘Tools‘ menu
2. Select ‘Account Settings‘
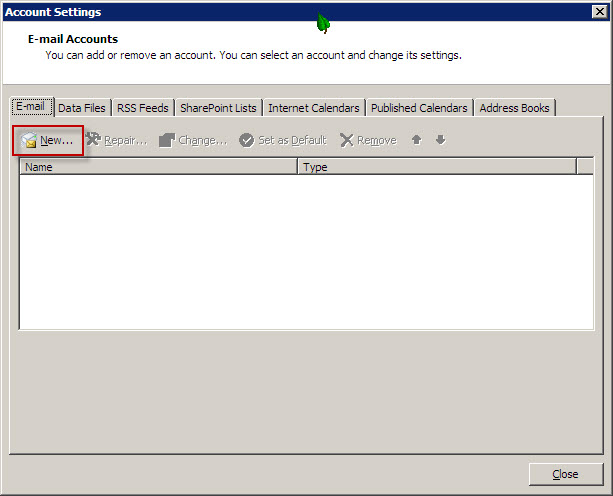
3. Click the New button
4. Choose Manually configure server settings
5. Click Next
6. Choose Internet E-Mail
7. Click Next
Account Settings
1. Enter your name as you want it to appear on your outbound email messages
2. Enter your full email address
3. Enter your full email address also as the User Name
4. Enter your email password
5. Your mail server is mail.hiwaay.net
6. The Outgoing Mail Server is the same as your incoming mail server
More Settings
1. Click the More Settings button
2. Click the Outgoing Server tab
3. Check the “My outgoing server (SMTP) requires authentication” checkbox
4. Check “use the same settings as your incoming mail server”
5. Click the Advanced tab
6. If you are using POP3 with SSL, click the checkbox and enter 995 as your port. Otherwise leave the default port at 110
7. If you are using POP3, you may choose when messages are removed from the server
8. If you are using IMAP with SSL, click the checkbox and enter 993 as your port. Otherwise leave the default port at 143
9. If you are using SMTP with SSL, click the checkbox and enter 465 as your port. Otherwise change the non-default port to 26
10. Click the OK button
Testing Settings
1. While on the E-mail Accounts screen, click the Test Account Settings button.
2. This will both check your settings and send a test email to yourself to confirm that everything is working. If you receive any errors, please check your configuration
3. Click the Close button on the Test Account Settings window
4. Click Next on the E-mail Accounts window
5. Click the Finish button
Outlook 2007 is now correctly configured to send and receive emails.
How to setup Windows Live Mail 2012
1. Upon opening Windows Live Mail, click on “Accounts” on the toolbar.
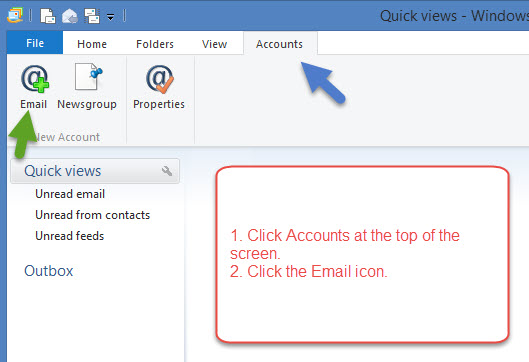
2. Click on “Email”
3. Fill in the fields below. Check the “Manually configure server settings” checkbox.
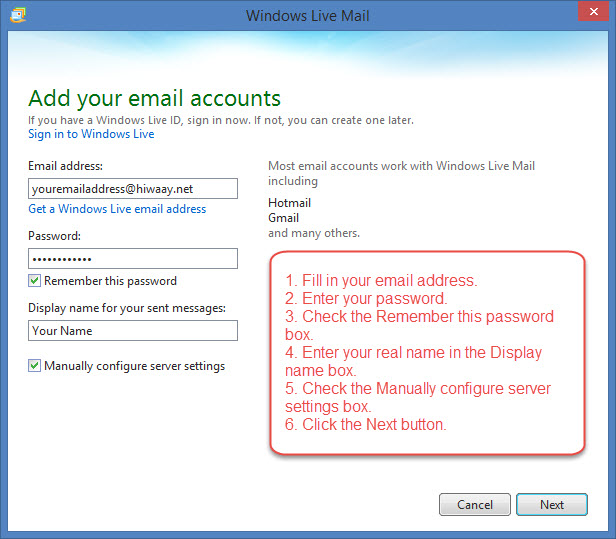
4. Click “Next”
5. Fill in the appropriate fields with this information
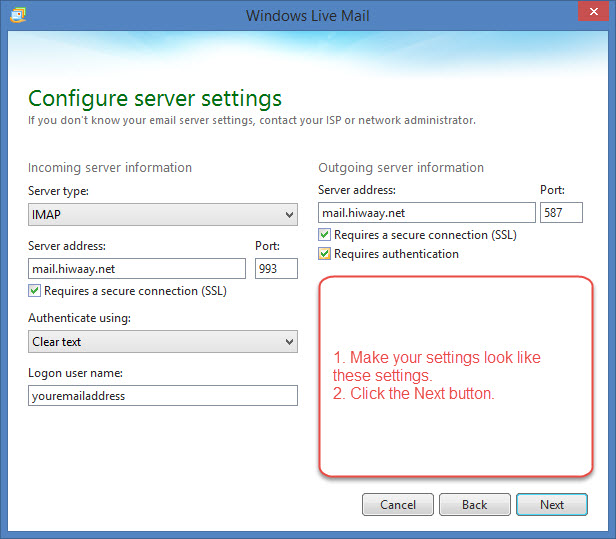
6. Click “Next“
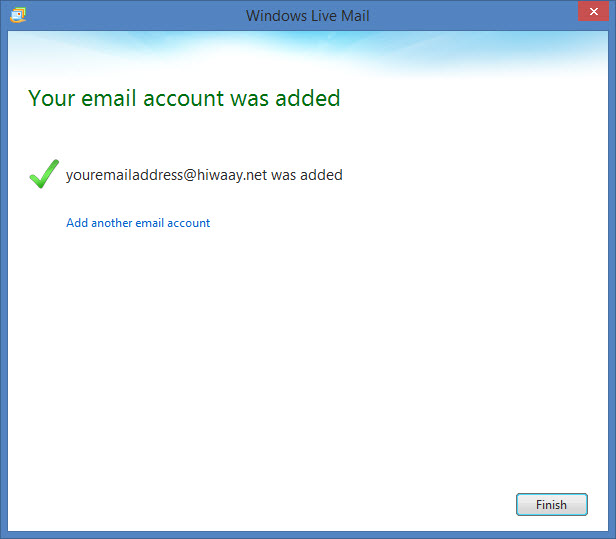
7. Click “Finish“
Windows Live Mail is now correctly configured to send and receive emails.
Or if you prefer to follow along with a video…
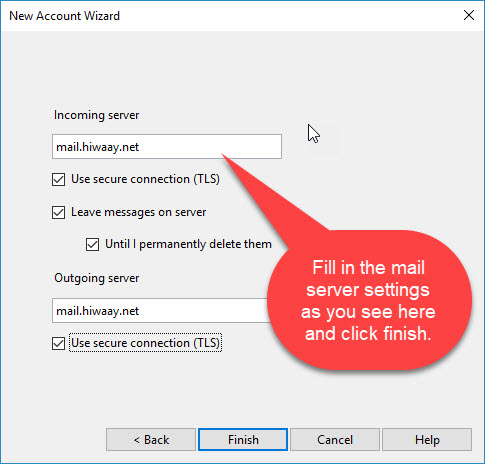
How to setup the Windows 8 Mail App
This guide will show step-by-step instructions for setting up E-mail in the Windows 8 Mail App.
1. Start the Mail App.
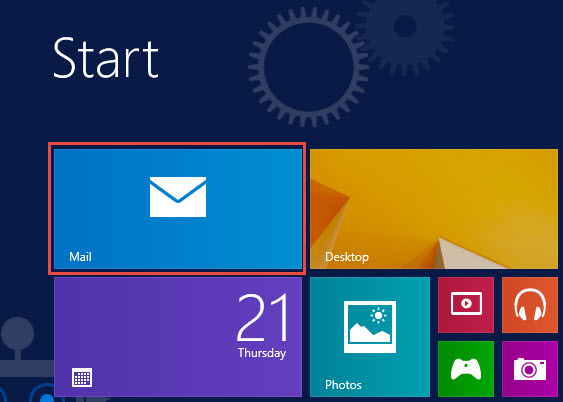
2. Choose Account Type. Select View All in Settings.
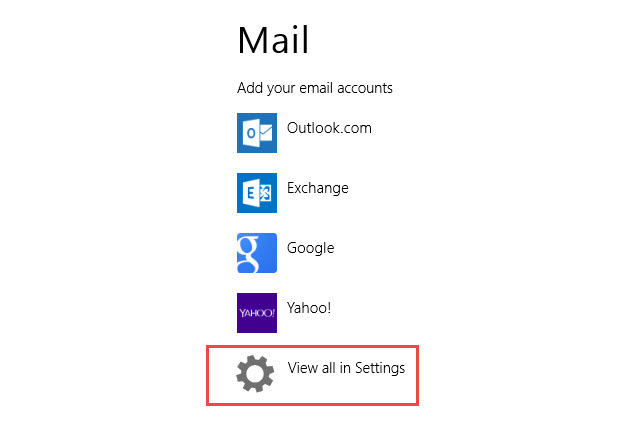
3. Choose Other Account.
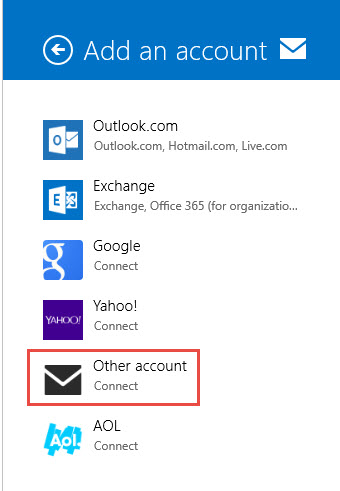
4. Select IMAP.
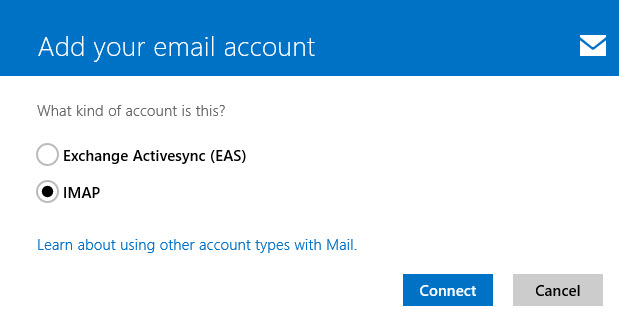
5. Enter your email account information and click Show more details.
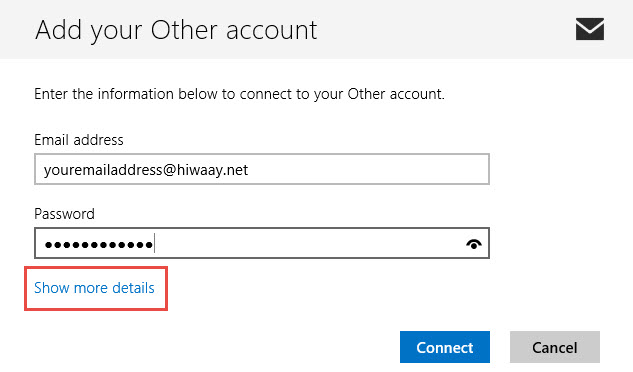
6. Enter all the server information as shown below.

7. Click Connect.
Mail is now setup to send and receive in the Windows 8 Mail App.
- Open the Mail App, then Click or Tap the “Accounts” button.
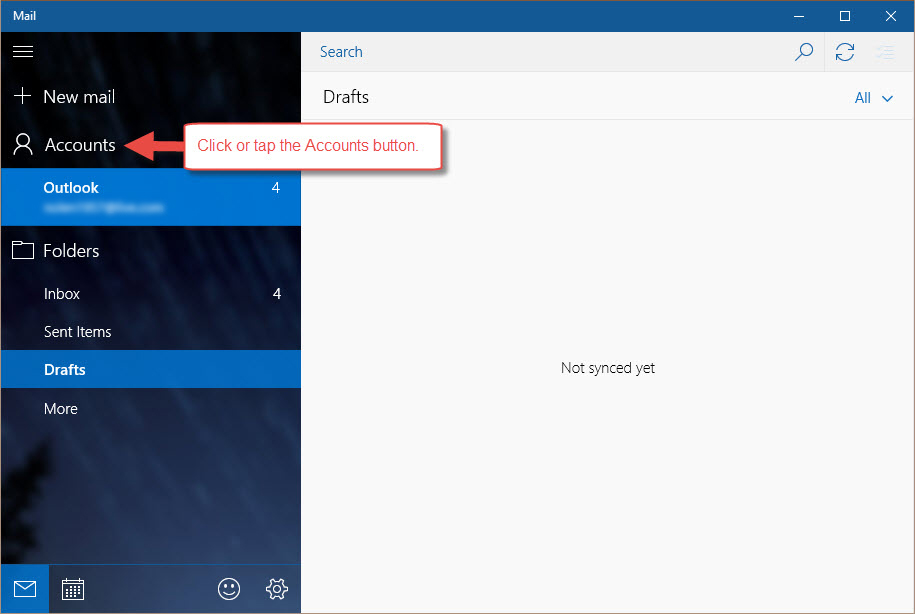
2. Click or Tap “Add Account”.
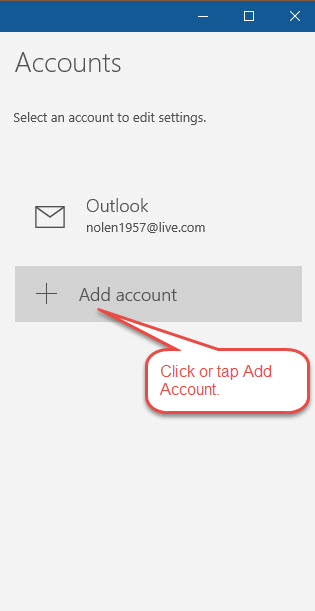
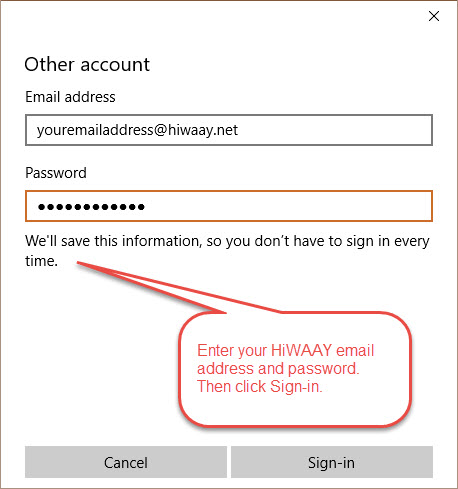
3. Click or Tap “Other account”.
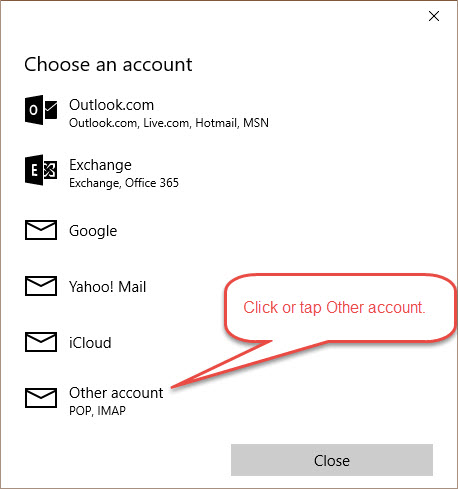
4. Enter your entire @hiwaay.net email address and your account password. Click “Sign-in”.
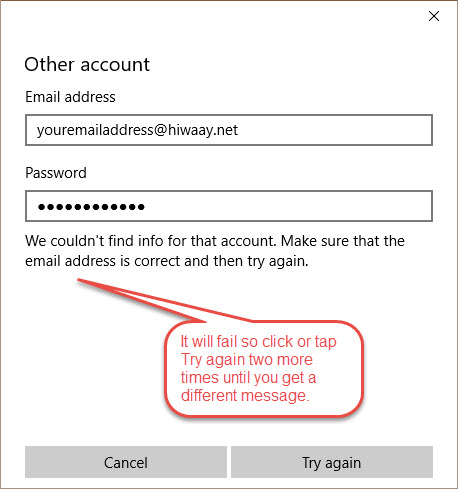
5. This step will fail 3 times before it will let you continue so click “Try again” twice more, then you’ll see a different message.
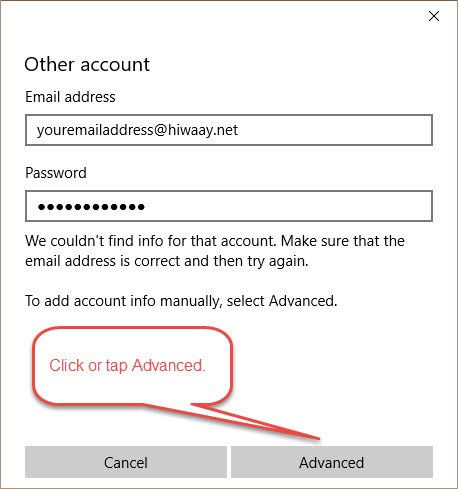
6. Tap or Click “Advanced”.
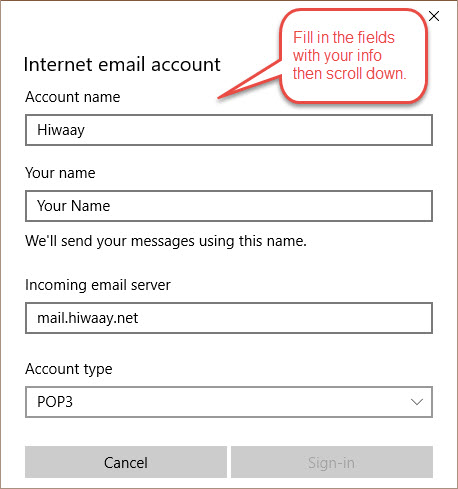
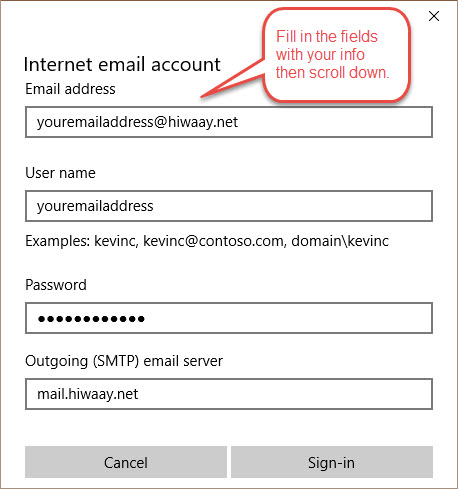
7. Fill in the fields as shown. Incoming mail server is mail.hiwaay.net and account type is POP3.
8. Fill in the fields as show with your email address and password, then scroll down.
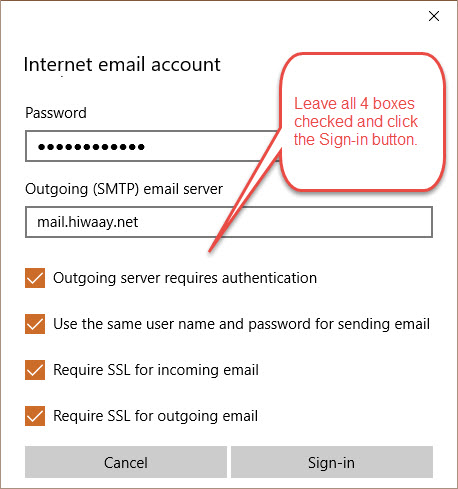
9. Leave ALL the check-boxes checked, then click or tap “Sign-in”.
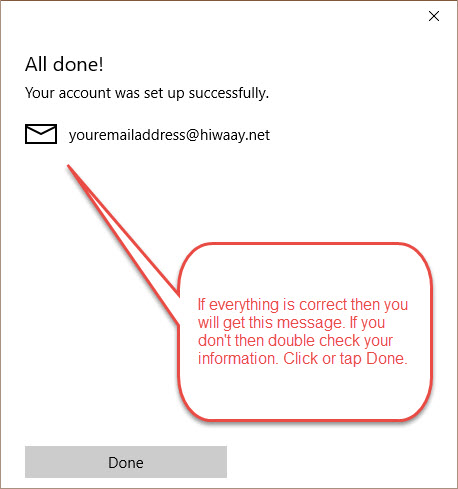
10. You should see the “All done!” success prompt. Click or tap “Done”.
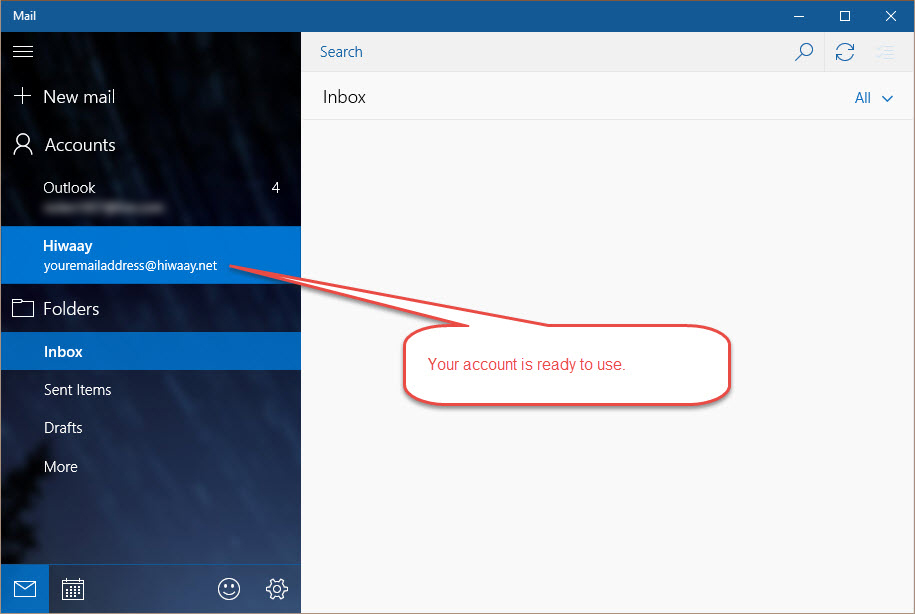
11. Your account is ready to use!
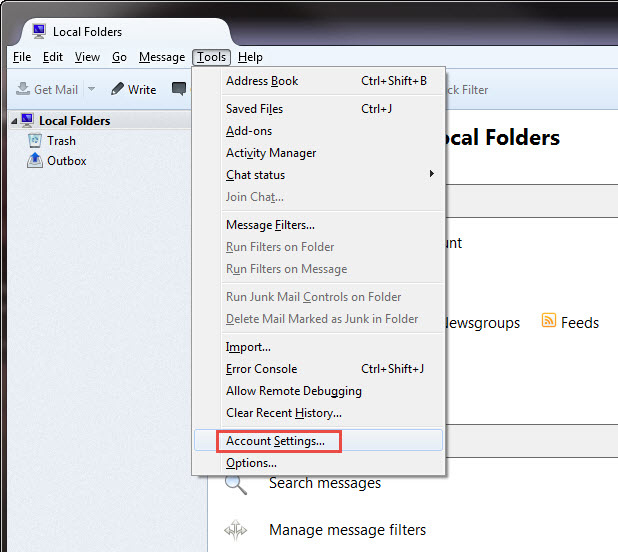
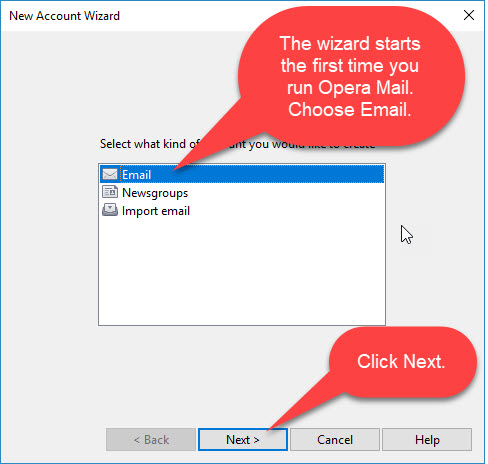
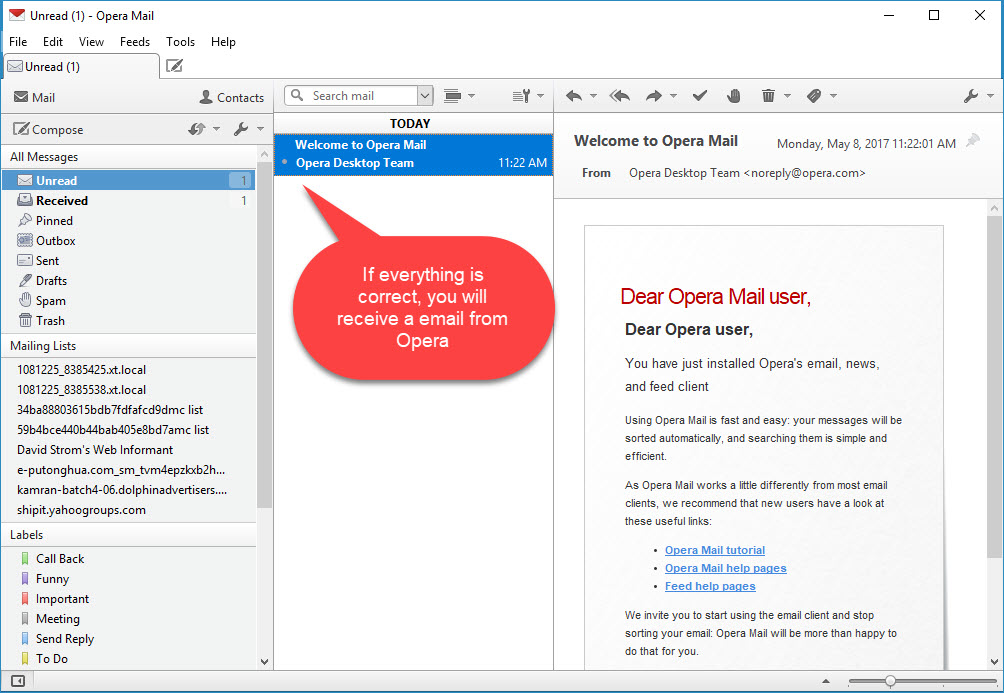
How to setup Mozilla Thunderbird
This guide will show step-by-step instructions for setting up E-mail on Mozilla Thunderbird for Windows, Mac OS X, and Linux. Due to differences in the operating systems, some screens and steps might vary. However, the steps should be the same across platforms. Thunderbird is a free E-mail client and can be downloaded from Mozilla.com.
Account Setup
1. Select the Tools menu
2. Select Account Settings
3. Click the Account Actions button
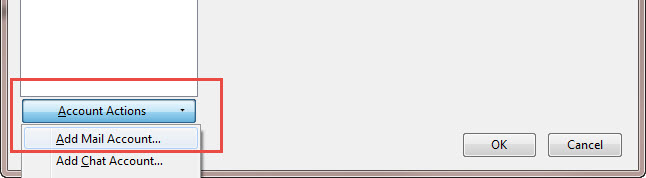
4. Click Add Mail Account
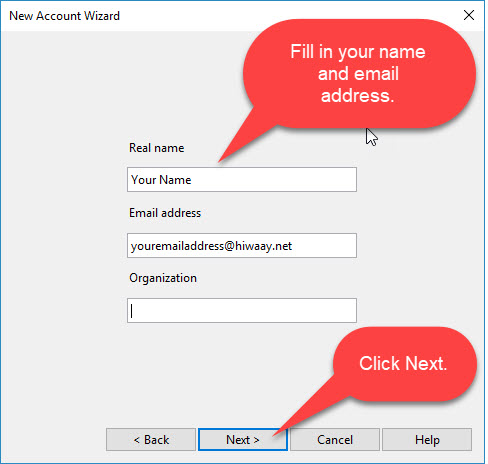
5. Enter your Name as you would like it to appear on your outgoing mail messages.
6. Enter your full Email address
7. Enter your Email password
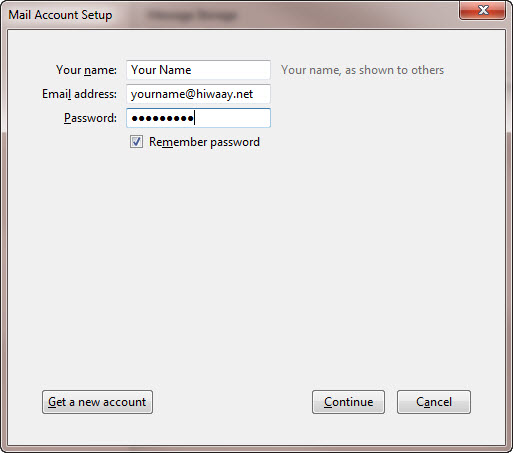
8. Click the Continue button
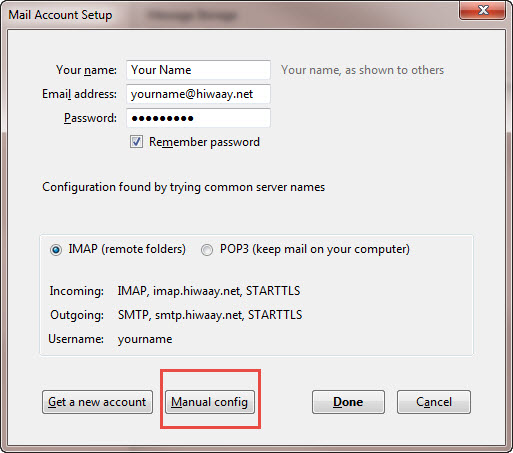
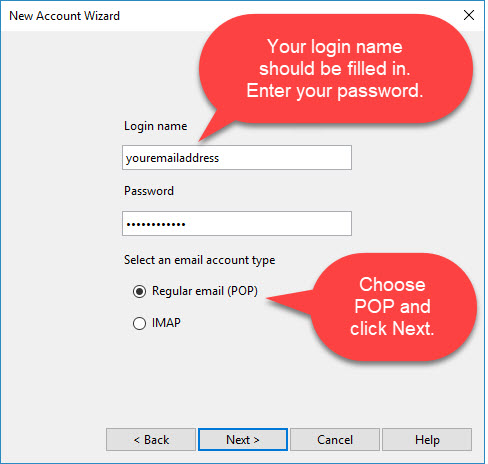
9. Thunderbird will now attempt to setup the account automatically. It will create an IMAP account and will not use SSL.
10. Once the automatic setup has completed click Manual config
11. Click the “Server Settings”
12. Enter your User Name
13. Click Outgoing Server (SMTP) from the left hand column
14. Highlight your new SMTP Server and click Edit
15. Enter your entire email address as the User Name, under the Security and Authentication section
16. Change the Port from Port: 25 (default) to 465
17. To make it easier to remember, give this account a distinct nickname for future reference.
18. Lastly click Done. If you get a popup about a certificate error, just click “Confirm Security Exception”.
19. Take a minute to review your account information. If everything appears to be fine, click OK to finish.
You should now be able to send and receive mail.
Or if you prefer to follow along with a video…
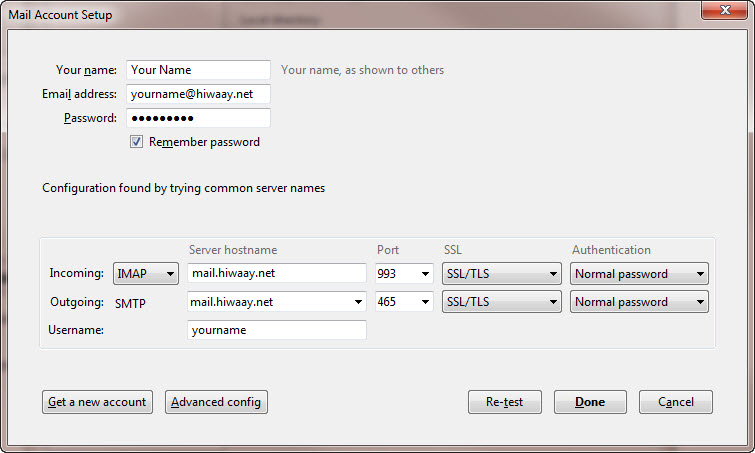
How to setup your email account in Mail (Mac Mail)
This guide will show step-by-step instructions for setting up email account in Mail on OS X.
Adding a New Account
1. Choose Preferences, from the Mail
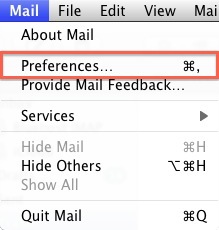
2. Select Preferences.
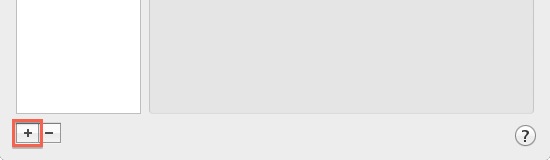
3. Click on the Accounts tab.
4. On the Accounts window, click the + (plus) sign.
Account Settings
1. Choose Add Other Mail Account
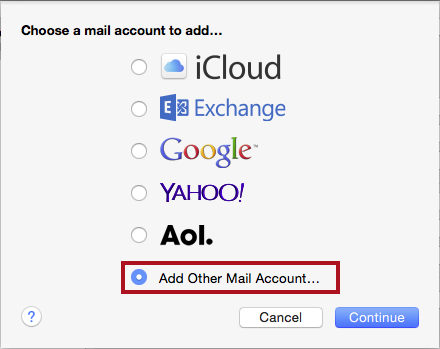
2. Click Continue.
3. Enter your Full Name, or as you would like it to appear on your sent email.
4. Enter your Email Address.
5. Enter your email account’s Password.
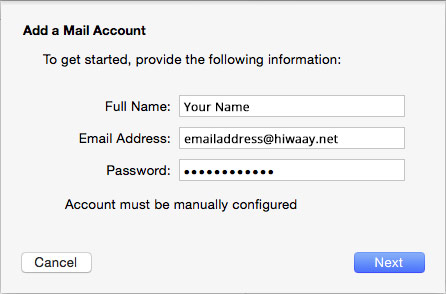
6. A message should appear saying “Account must be manually configured”. Click Next.
Incoming Mail Server
When entering the information for your Incoming Mail Server you will need to decide if you would like to use POP3 or IMAP. POP3 will download and remove all of the emails from our server, whereas IMAP will synchronize the emails between your email client(s) and our server. IMAP is recommended if you will be using this email account with multiple devices since they will all synchronize.
- Choose your account type. You may select either POP or IMAP
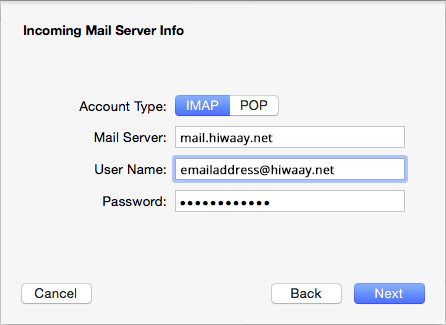
- Please enter mail.hiwaay.net as the Incoming mail server.
- Enter your full email address as the User Name.
- Enter the Password of your email account.
- Click Next.
Incoming Mail Server Info
- For Path Prefix, please enter INBOX.
- If you are using IMAP, make sure you are using either port 143 with no SSL -OR- port 993 with SSL.
- If you are using POP3, make sure you are using either port 110 with no SSL -OR- port 995 with SSL.
- Authentication should be set to Password.
Outgoing Mail Server
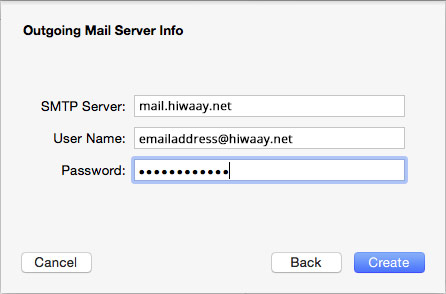
- The Outgoing Mail Server is the same as your incoming mail server.
- Enter your full email address as the User Name.
Note: Outgoing username and password could say “optional” in the field. Please be sure to add your username and password to it.
- Enter the Password of your email account.
- You may receive a message saying Additional account information required.
- For the port number, you can use port 587 with no SSL or port 465 with SSL.
- Make sure the Authentication is set to Password.
- Click the Create
Complete the Setup Process
If you are running Yosemite you may want to change two options to make sure that your account settings don’t change. These steps only apply to apple computers running Yosemite.
- Choose Preferences, from the Mail
- Select Preferences.
- Click on the Accounts tab.
- Click on Advanced.
- Uncheck the option labeled “Automatically detect and maintain settings“.
Now Click on Account Information
- Under Outgoing Mail Server(SMTP) select the “Edit SMTP Server List” option.
- Click Advanced.
- Uncheck the option labeled “Automatically detect and maintain settings“.
- Click OK
Mac Mail is now set up to send and receive email.
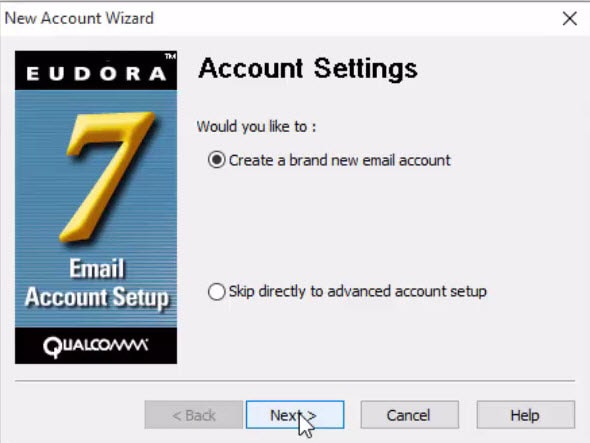
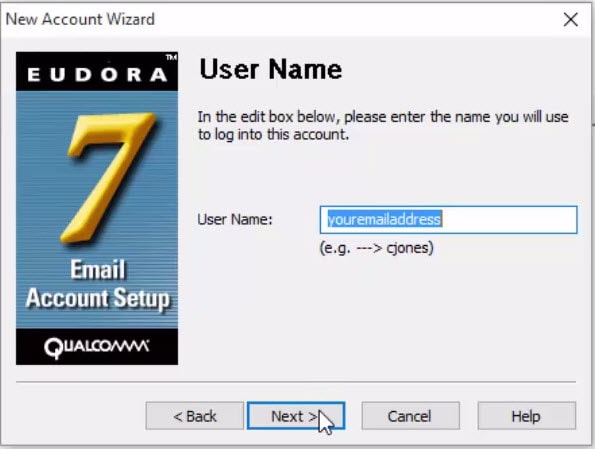
How to setup your email account on Eudora.
This guide will show step-by-step instructions for setting up email account in Eudora version 7.
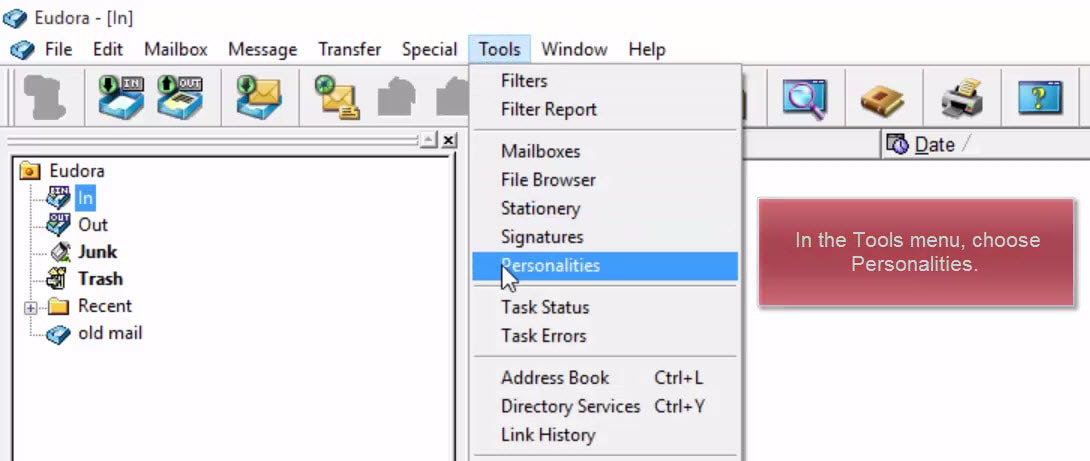
Right-click anywhere in the Personalities frame and click ‘New’.

Select ‘Create a brand new email account’ radio button, and click ‘Next’.
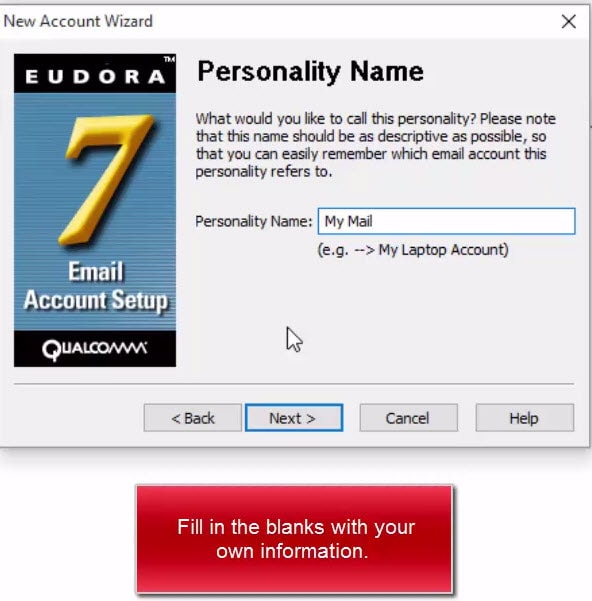
Name the account (anything you want).
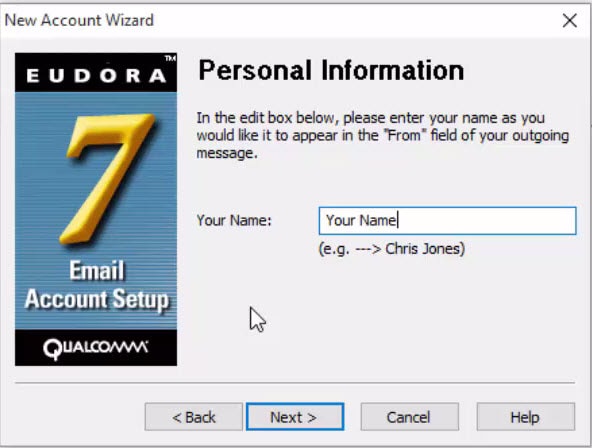
Enter your name as you want mail recipients to see it.
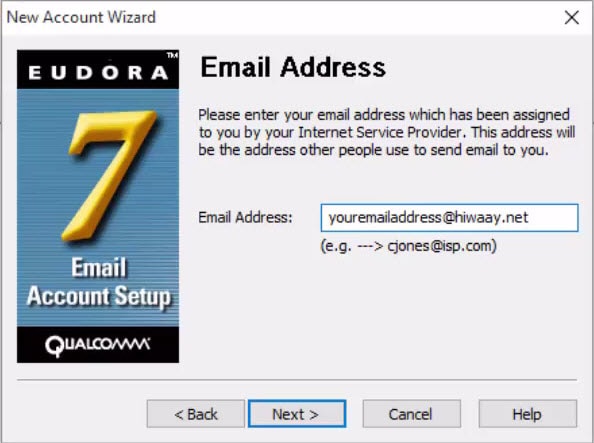
Enter your full Email address.
Enter your account username (everything before the @ in your email address).
Incoming email server is mail.hiwaay.net.
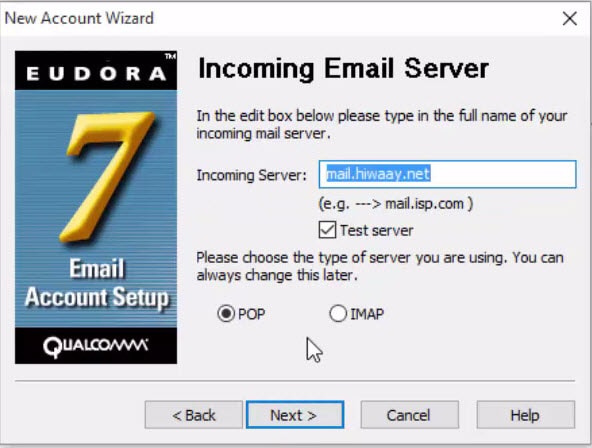
Outgoing server is mail.hiwaay.net. Check ‘Allow Authentication’. Then click ‘Next’.

Success! Click ‘Finish’.
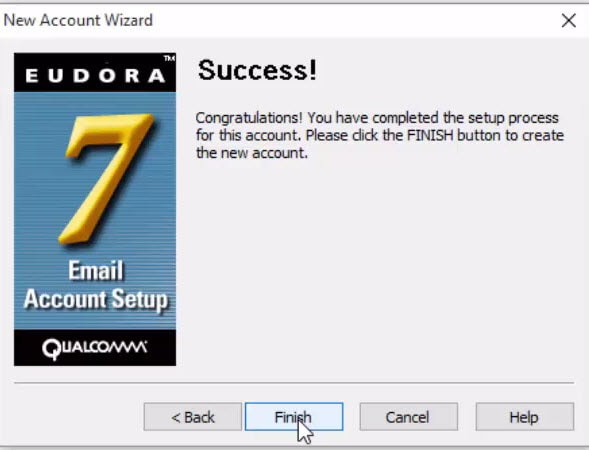
After you click ‘Finish’, right-click the new account and click ‘Properties’…

On the Generic Properties tab…
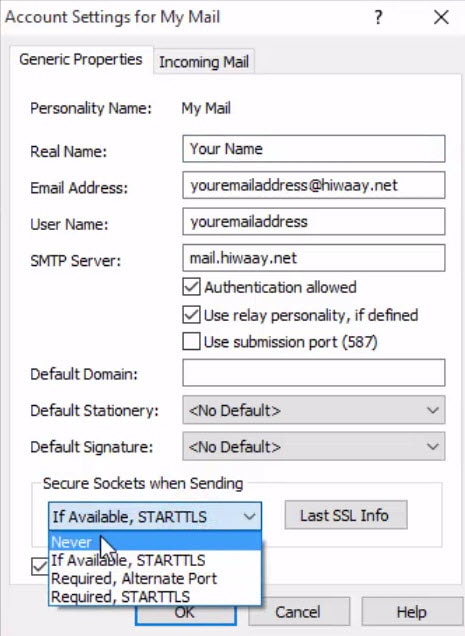
Then on the Incoming Mail tab…
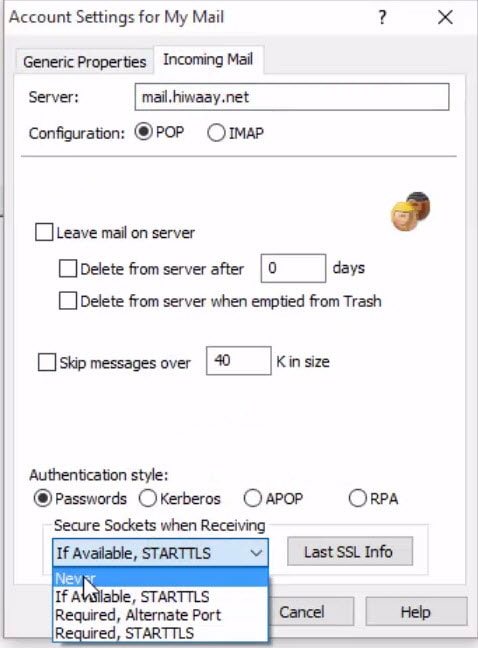
Then click ‘OK’.
Eudora is now set up to check your @hiwaay.net email!
If you’d like to see a video of this process and follow along, it’s HERE!
How to setup your email account on iPhone/iPad with iOS 7 or newer.
This guide will show step-by-step instructions for setting up email account on your iPhone.
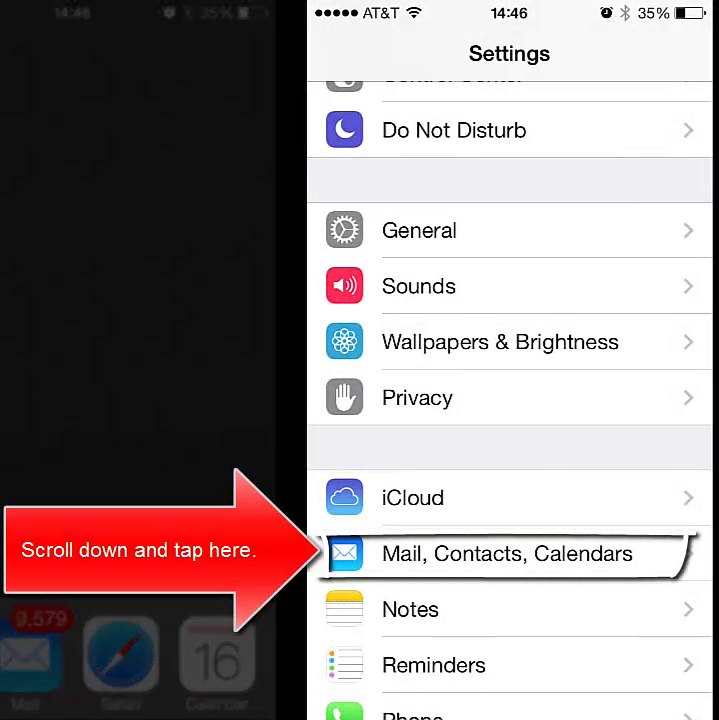
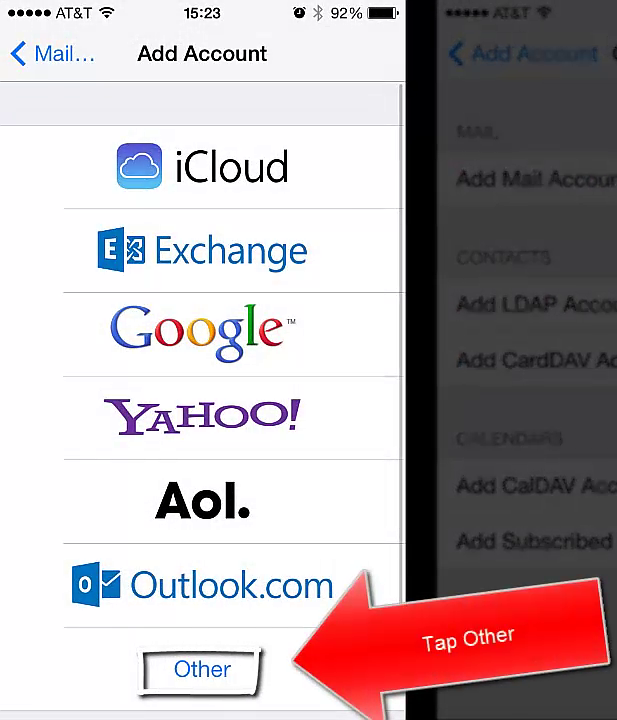
1. From the Home screen, tap Settings.

2. Next, tap Mail, Contacts, Calendars.
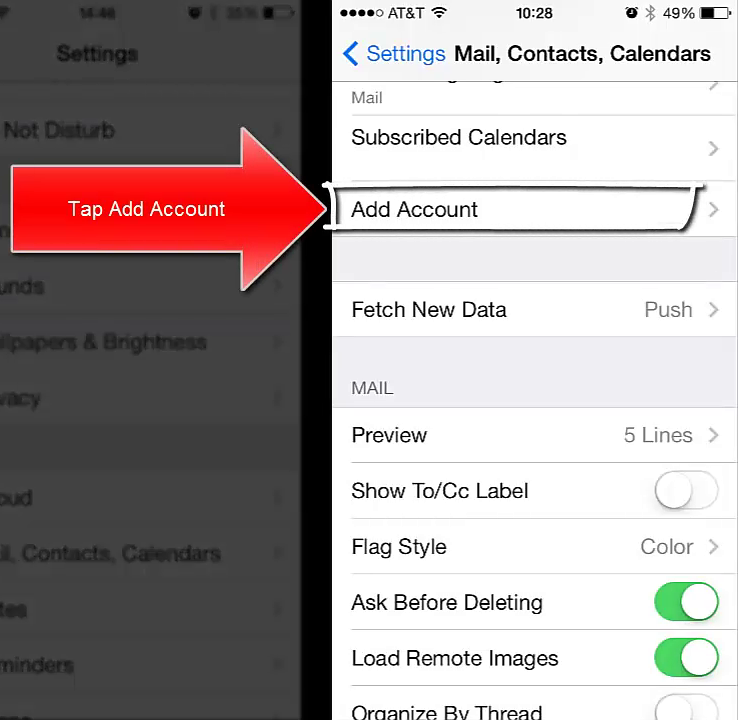
3. In the Accounts section, tap Add Account.
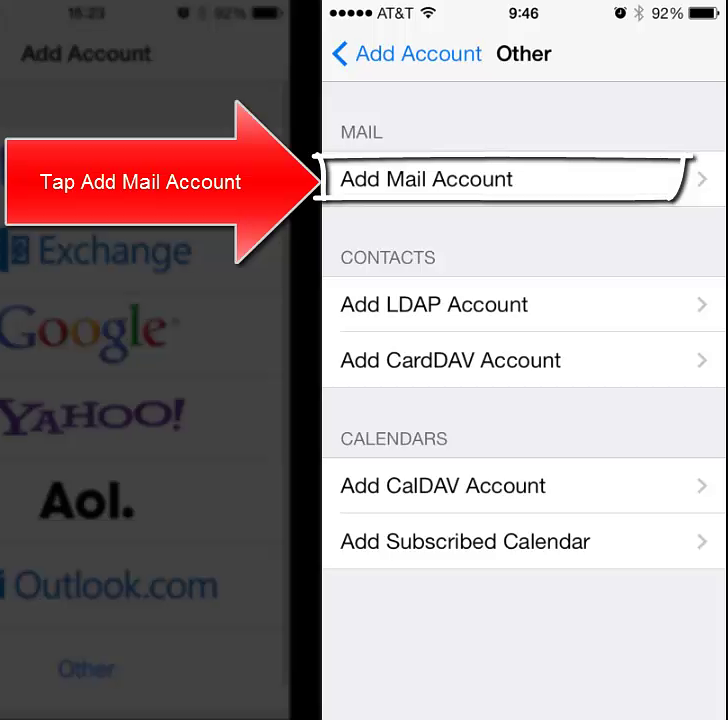
4. For setting up email to work with your HiWAAY service, choose Other.
5. Select Add Mail Account under the Mail section.
6. IMAP is on by default. Keep that setting.
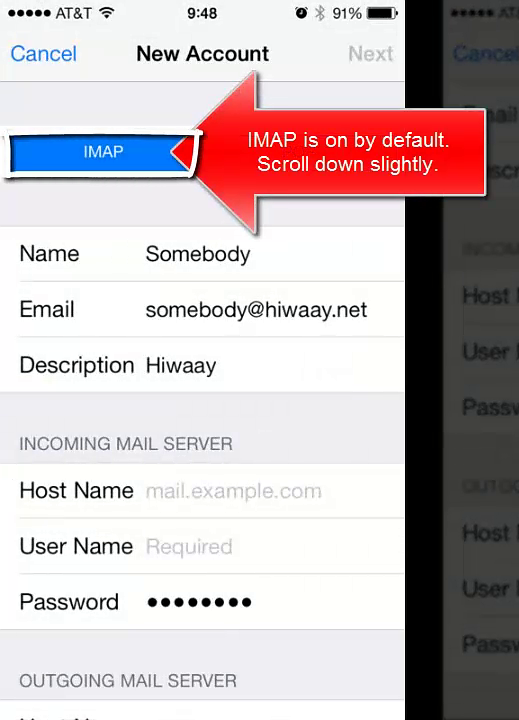
7. Enter your name and Email account information as shown.

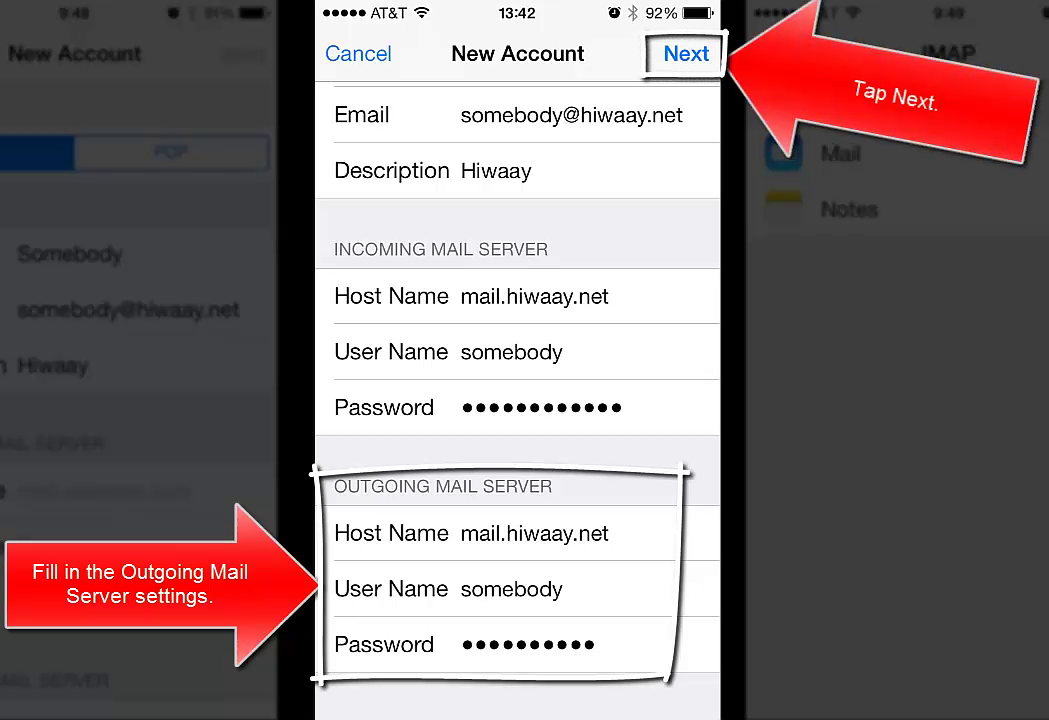
8. Tap Next.
9. Make sure Mail shows as 0n and green, then tap Save.
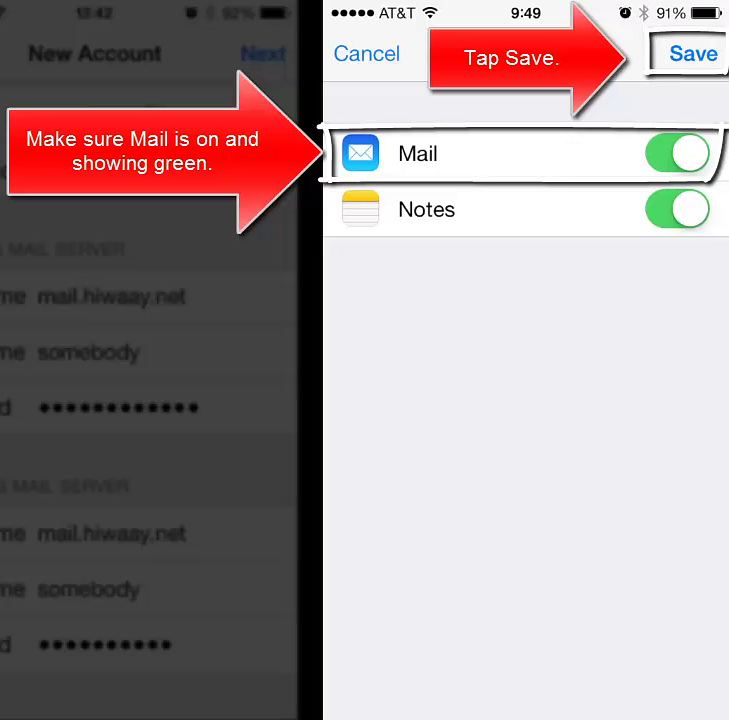
10. There are additional settings, so now tap the new HiWAAY mail account to edit it.
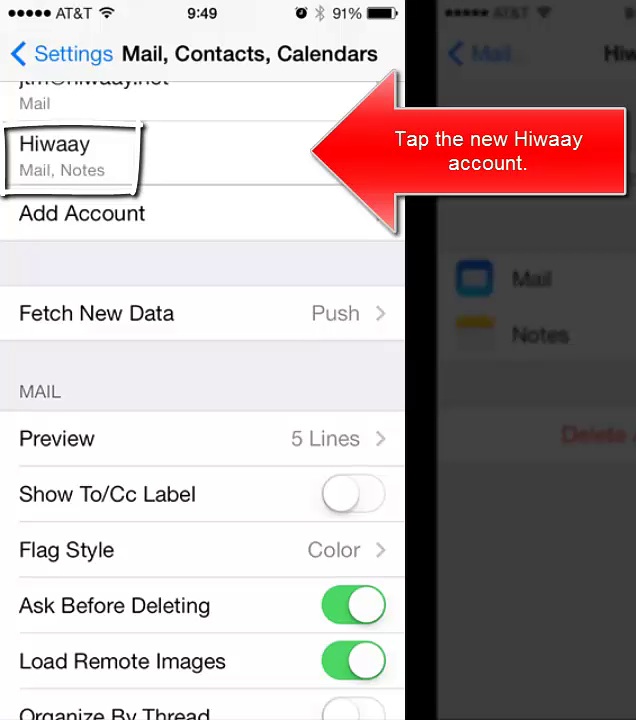
11. Tap the email address to edit settings.
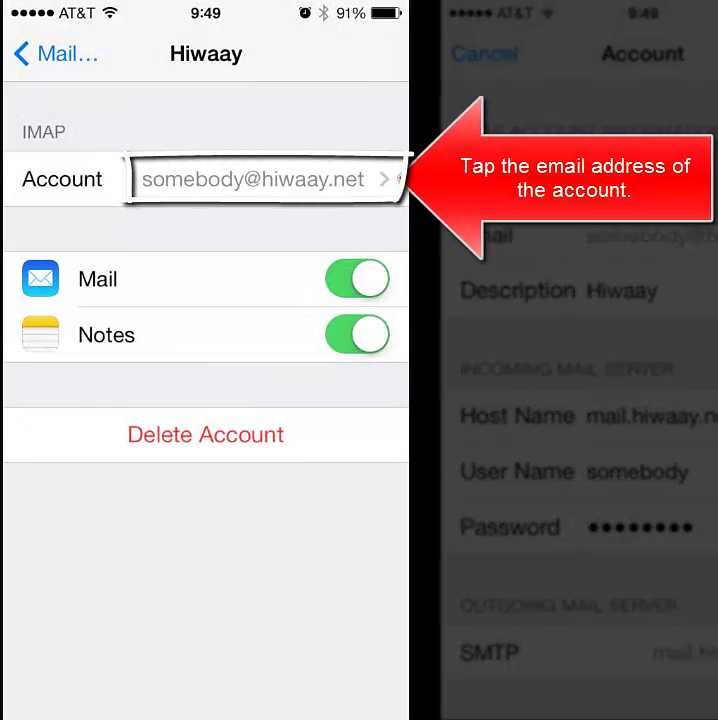
12. Tap mail.hiwaay.net (Outgoing Mail Server) to edit.
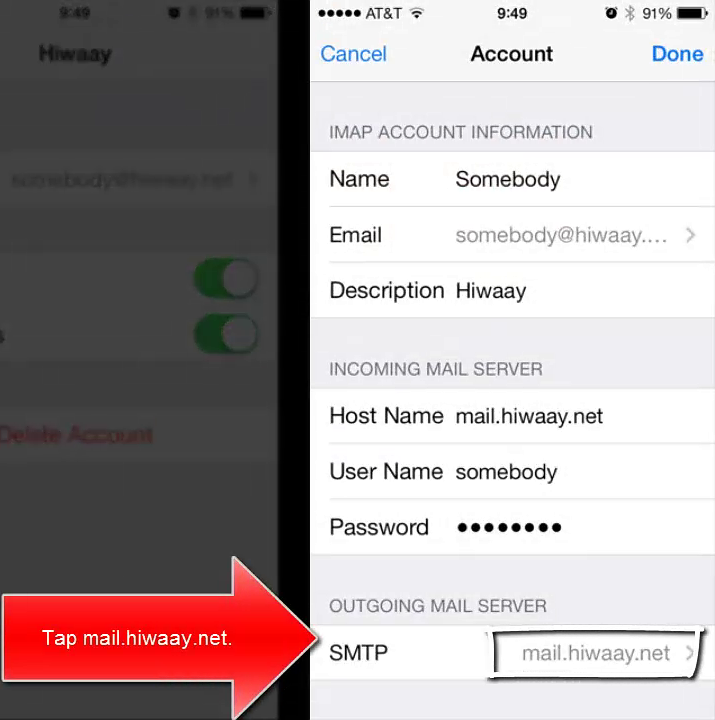
13. Tap mail.hiwaay.net again (Primary Server). (yeah! so many steps! wow!)
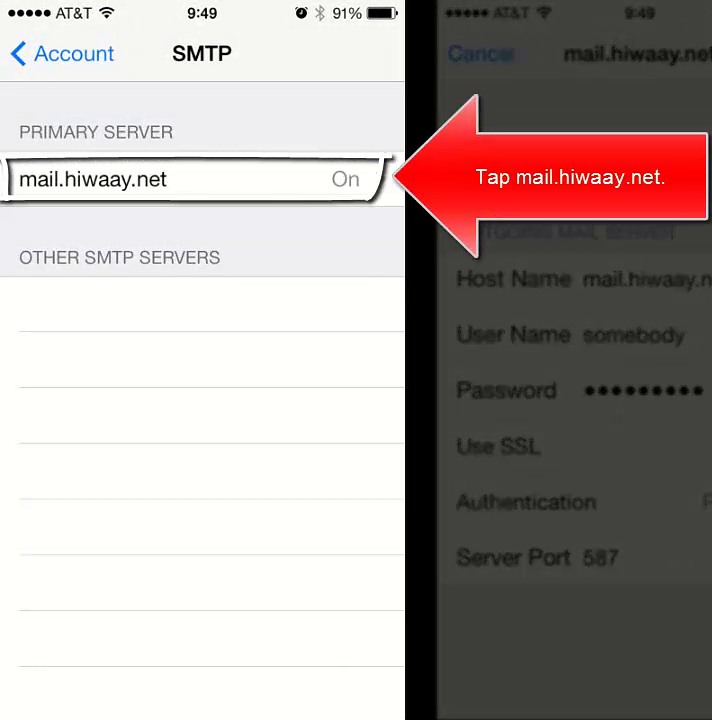
14. Tap the Server Port to edit and change it to 587.
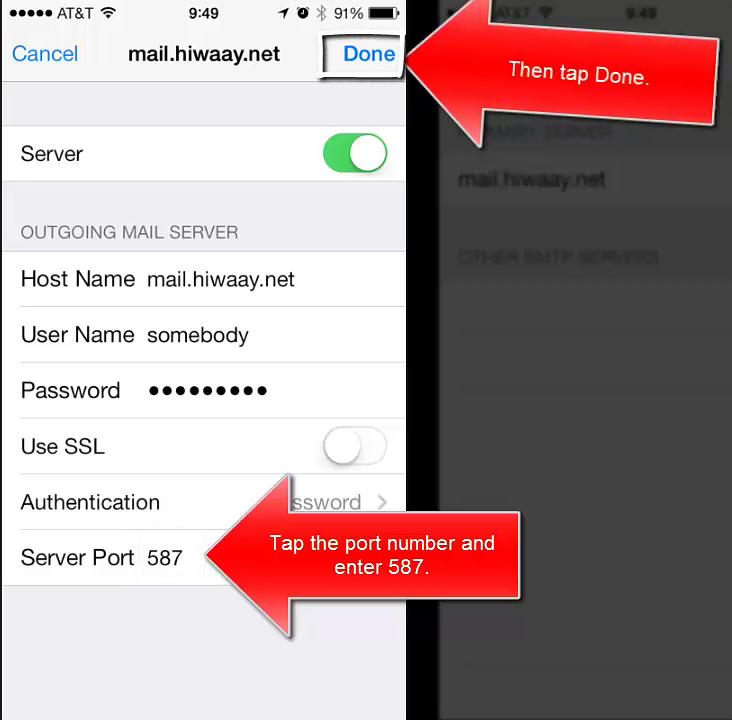
15. Tap Done in top right corner.
16. Mail setup is complete at this point. Tap the Home button to close.

Your iPhone is now set to send and receive HiWAAY email.
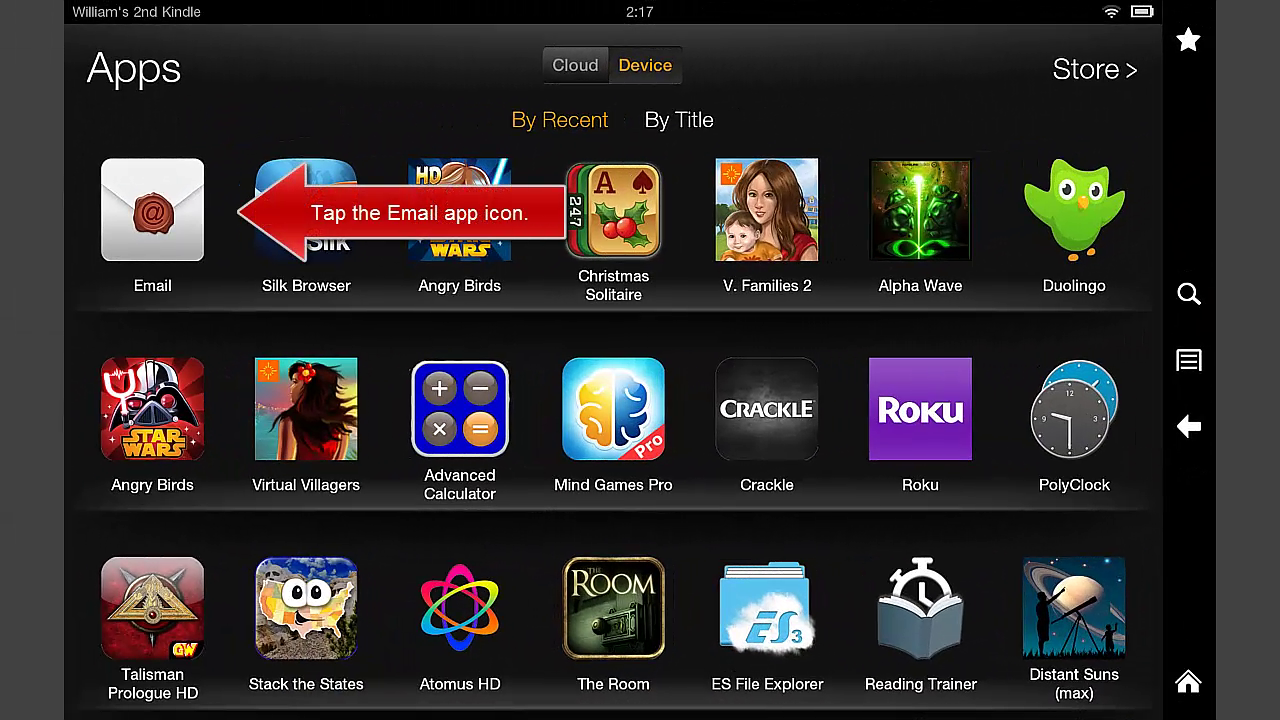
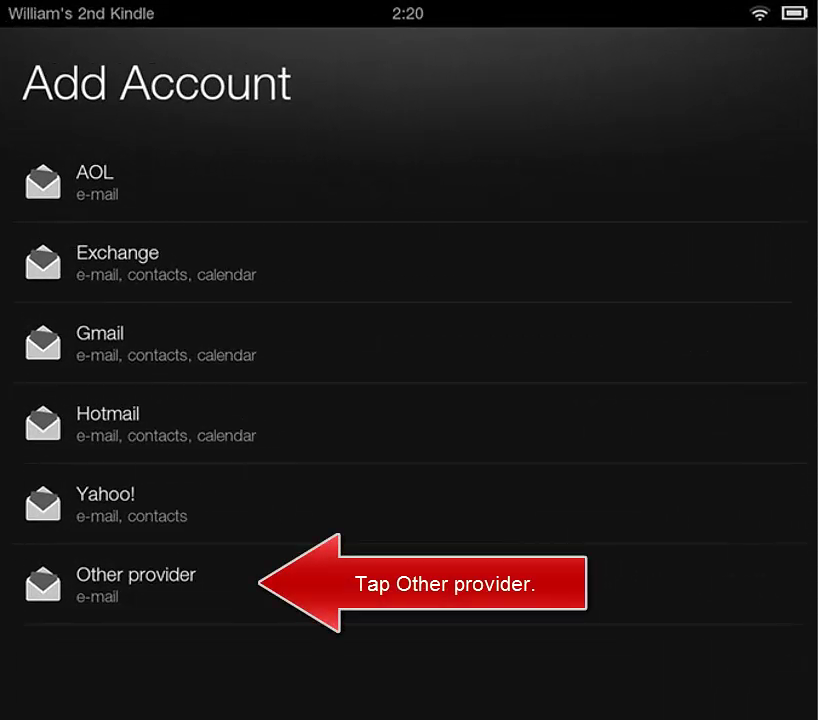
How to setup your email account on Kindle Fire HD.
This guide will show step-by-step instructions for setting up email account on your Kindle Fire HD (4.0.3 API level 15).
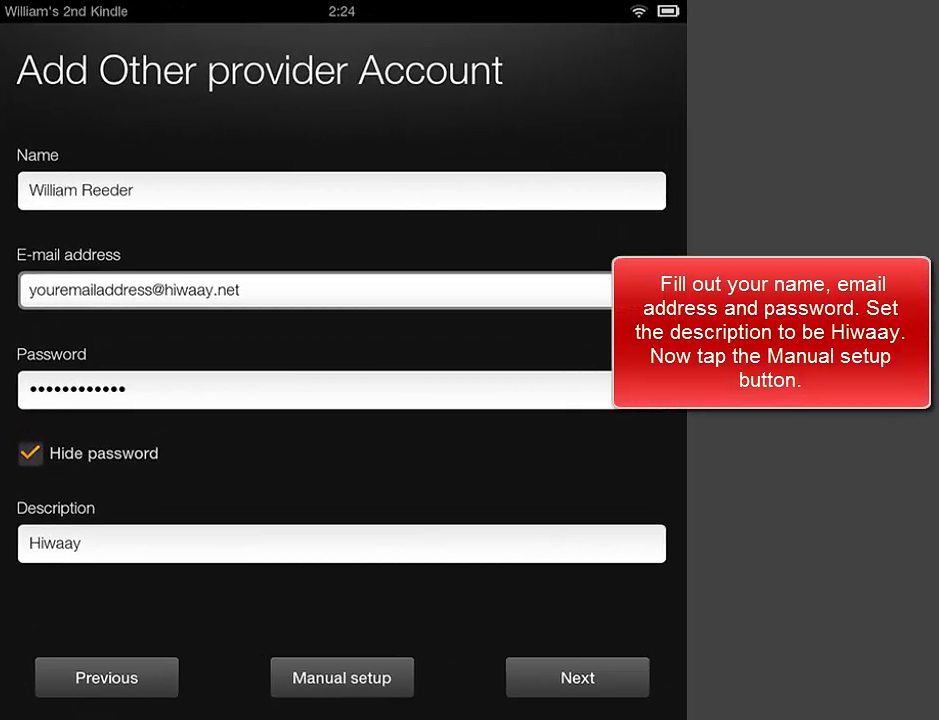
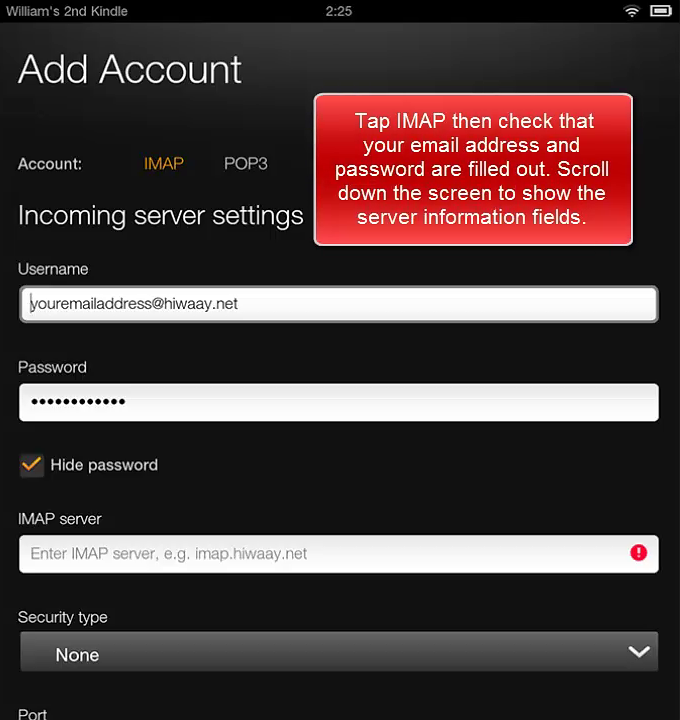
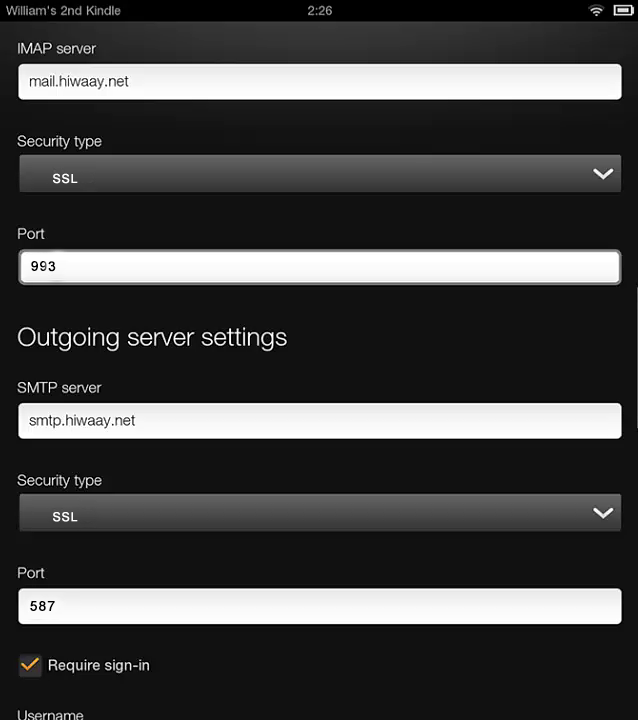
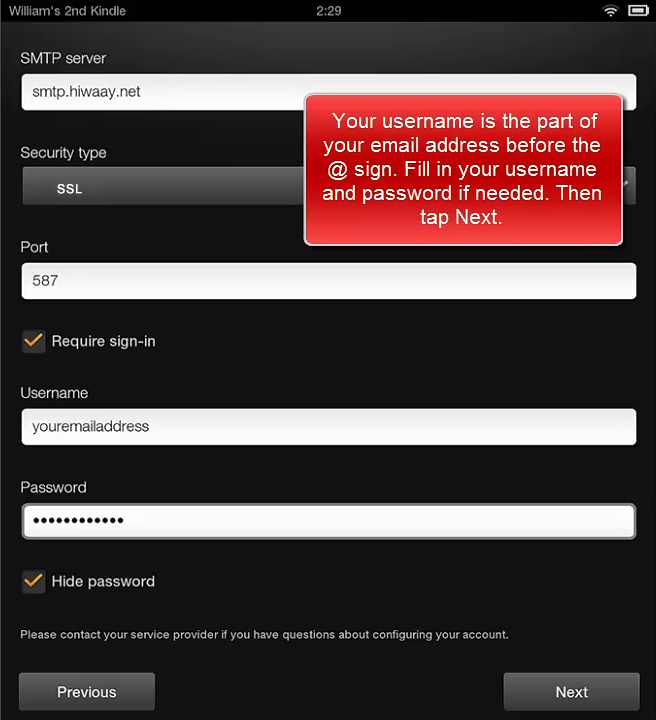
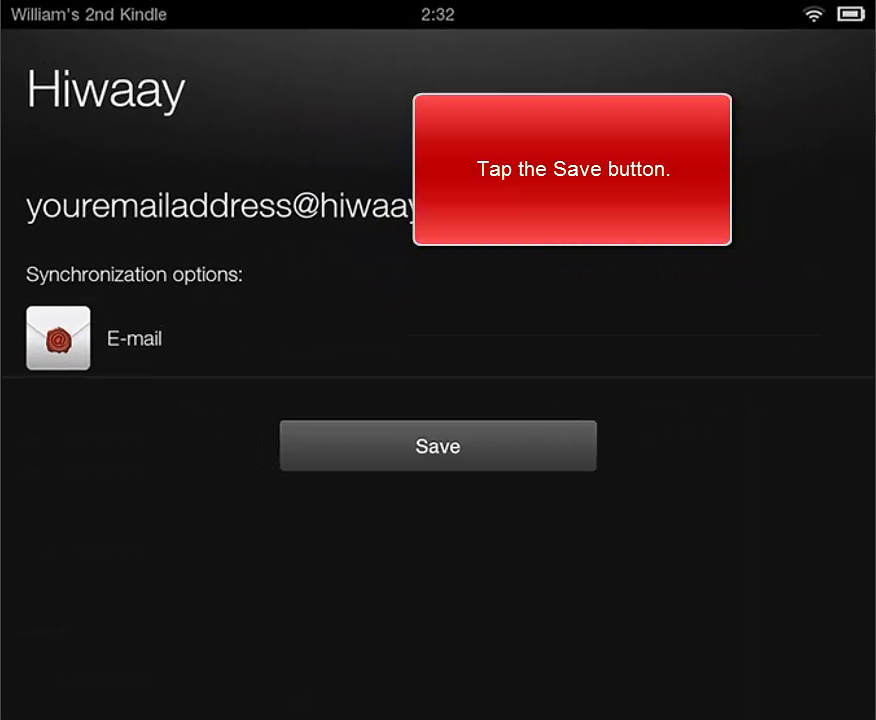
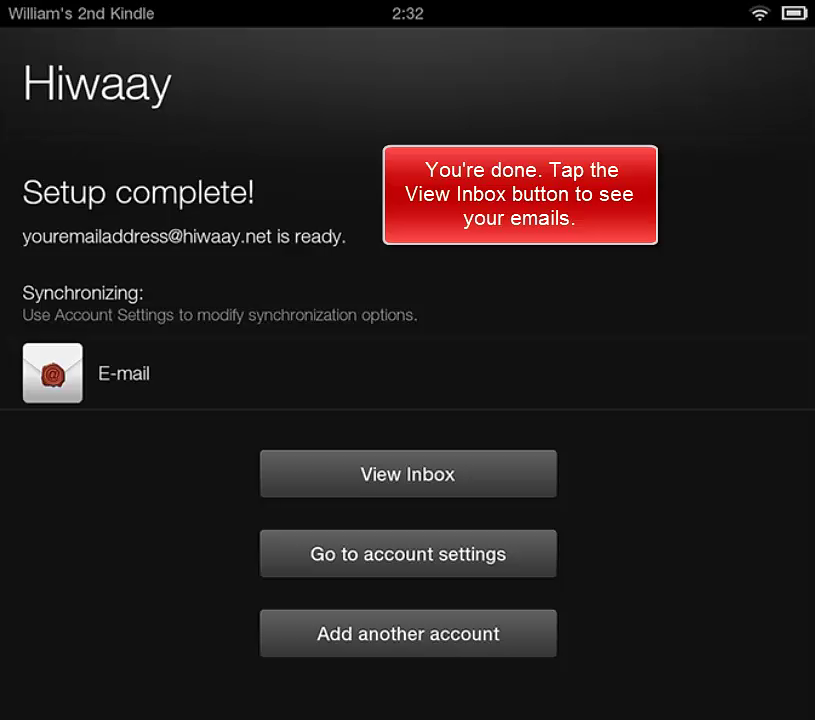
Your Kindle is now set to send and receive HiWAAY email.
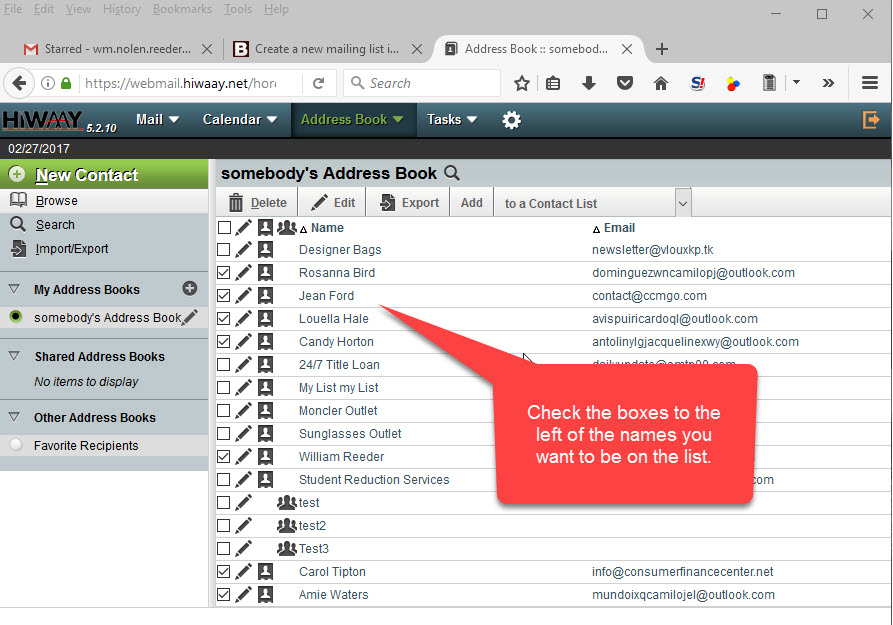
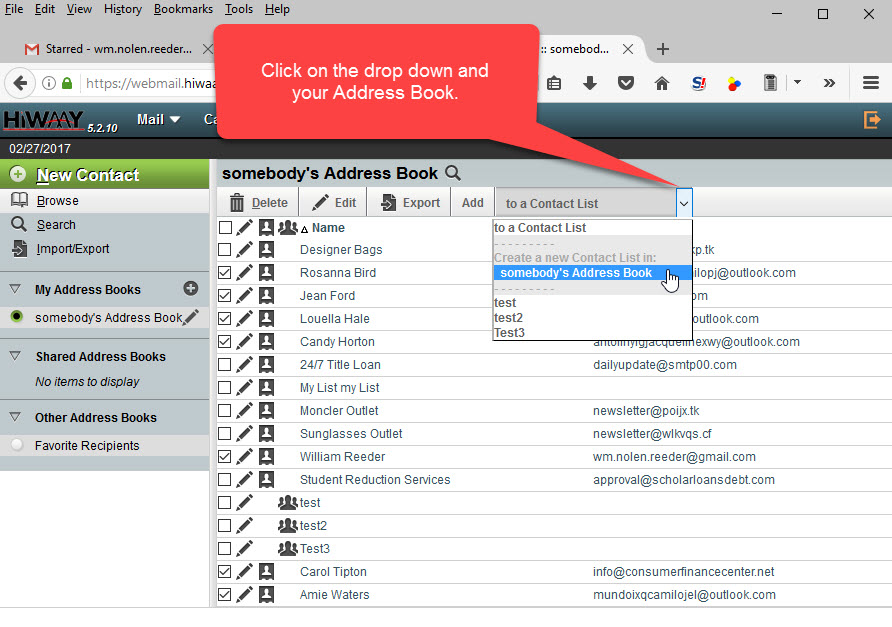
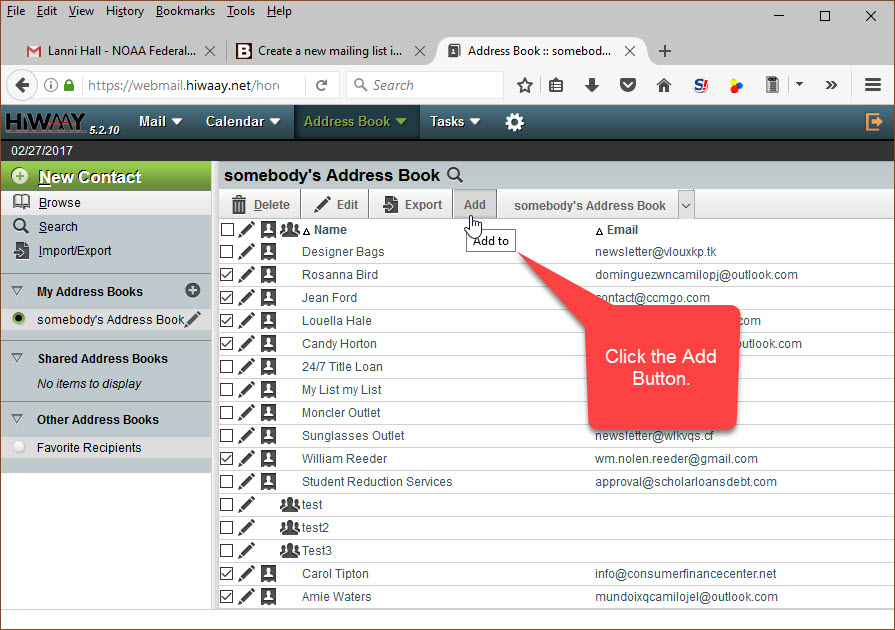
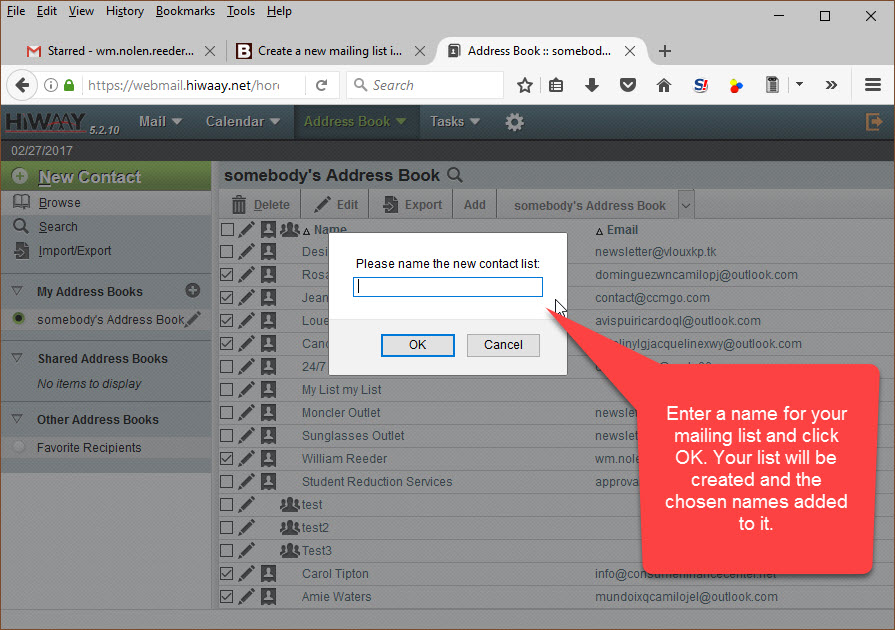
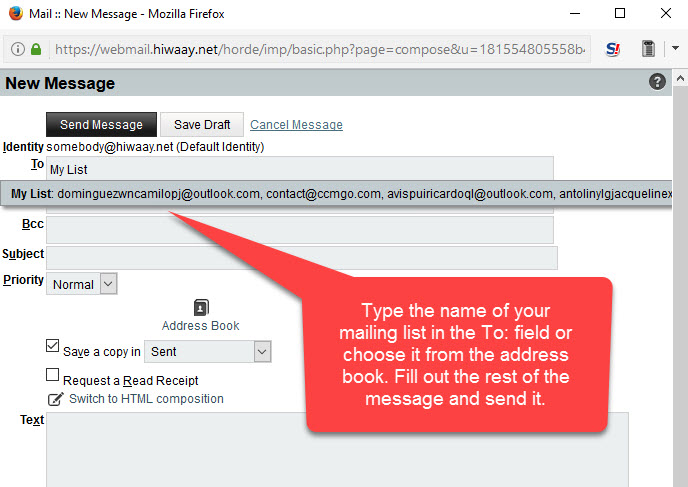
Webmail FAQs
– Open the web browser of your choice and navigate to webmail.hiwaay.net.
– Enter your HiWAAY username and account password to access the HiWAAY webmail system.
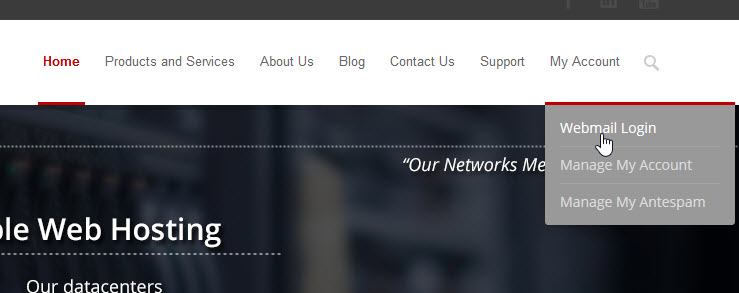
**If you get a “Page not Found 404 error”, you are likely using a old shortcut or bookmark that does not work anymore. Try going to the HiWAAY website and use the ‘Webmail Login’ link under the ‘My Account’ menu item, or just type webmail.hiwaay.net in the address bar of your browser.**
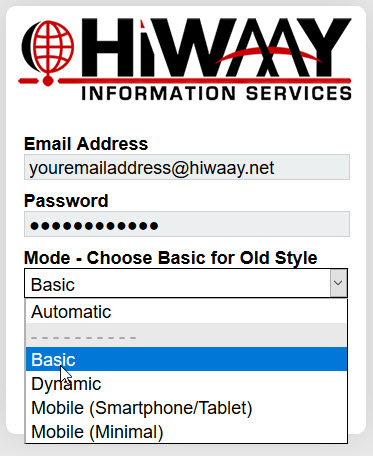
1. The new login screen is a little different since the new webmail interface now offers interfaces for mobile devices like phones and tablets.
2. Go to https://webmail.hiwaay.net or use the link off of the HiWAAY website.
3. You should enter your whole HiWAAY email address. Failing to do this can cause your address book or calendar not to be available.
4. Enter your email password.
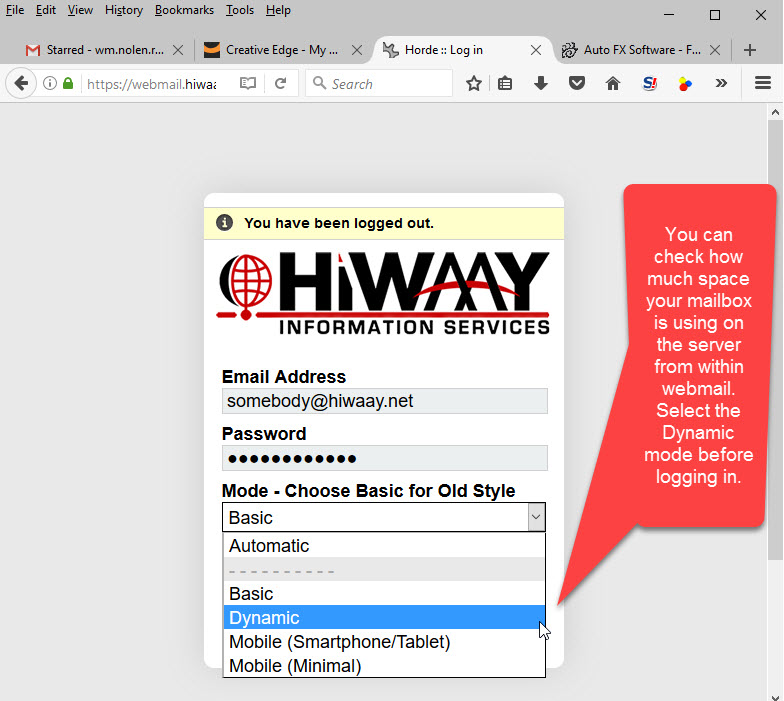
5. If you are using a computer to access webmail, click on the word Automatic under the Mode section and choose Basic from the drop down.
6. Basic mode is similar to the old webmail interface.
7. Click the Log in button.
1. Click the orange icon in the upper right that looks like a door and an arrow.
![]()
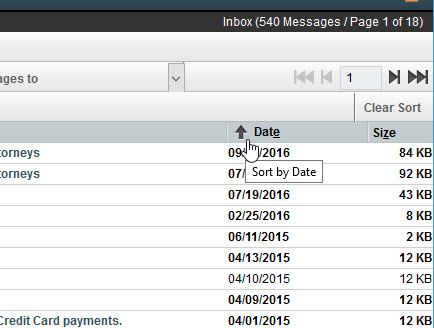
1. While looking at your inbox, click directly on the word “Date” at the top of the date column. You may have to click twice to get messages in the correct order you want.
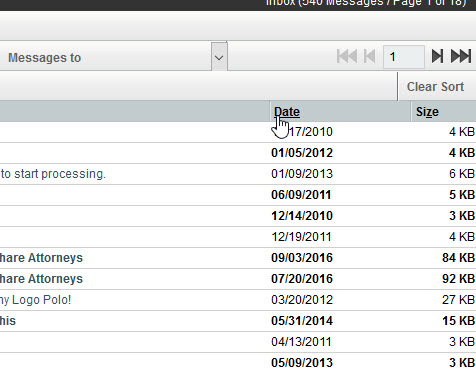
2. Once you click on Date, an arrow appears showing if the dates are sorted in ascending or descending order.
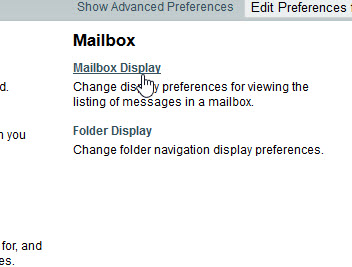
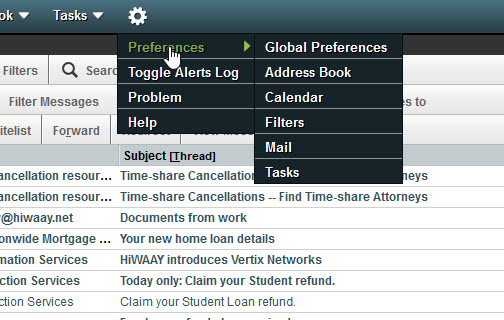
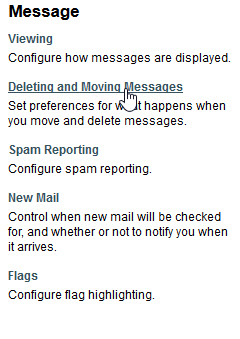
1. Click on the icon that looks like a gear. Choose ‘Preferences’ then ‘Mail’ from the menu that pops up.

2. Click on ‘Mailbox Display’.
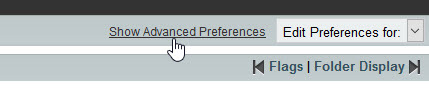
3. Click on ‘Show Advanced Preferences’ in the upper right.
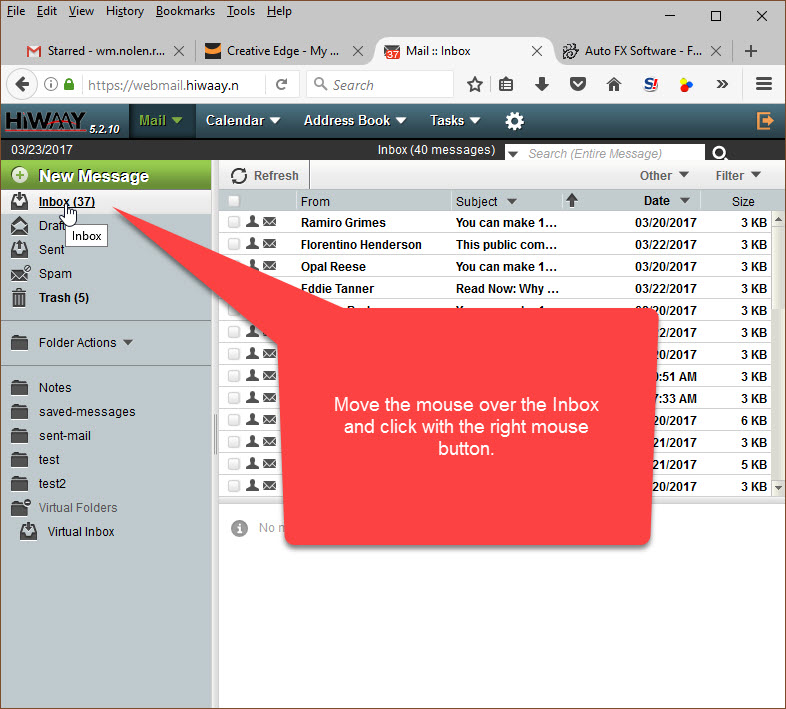
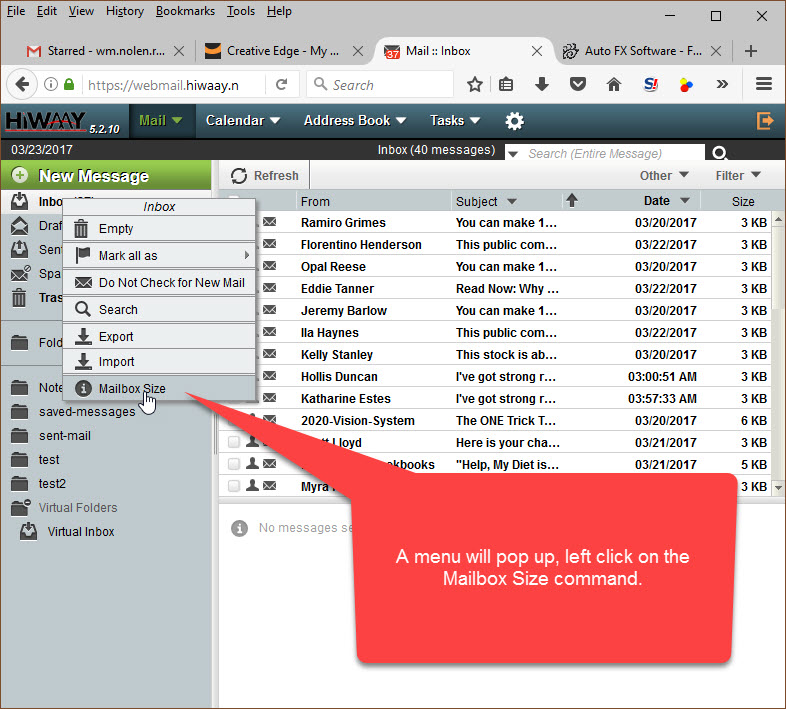
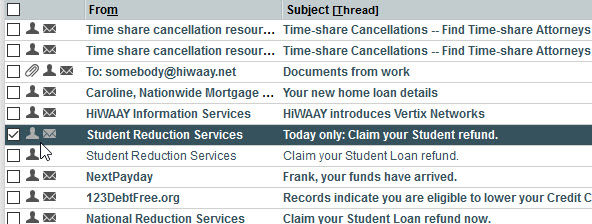
4. You will now see a list of options. The image below shows settings that will:
a. Display your Inbox when you login.
b. Display the first page of messages if you have more messages than the page can display.
c. Sort messages by Date.
d. The sorting order will show the newest messages at the top of the page.
e. 30 messages per page will be shown. You can increase this number up to 999 and then scroll through the list. This is good for deleting large numbers of messages.
f. The sender’s email address will be a link to click to open the message for reading. You can change this to where clicking the sender’s email address will open the New Message dialogue box so you can send a reply.
g. The last checkbox will cause a Paperclip icon to be display in the leftmost column of the listing of messages indicating that the message has an attachment.

h. Click Save
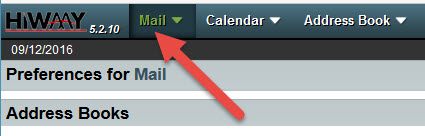
i. You can get back to your inbox by clicking the green word “Mail” at the top of the screen.
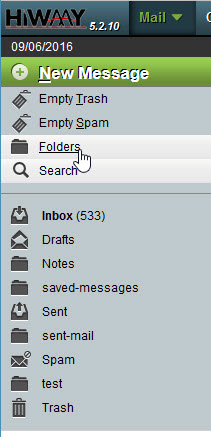
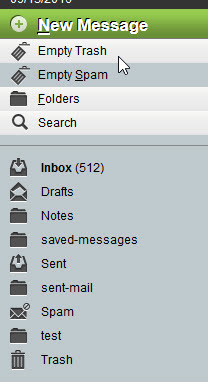
If you don’t have all of your folders you can follow these steps:
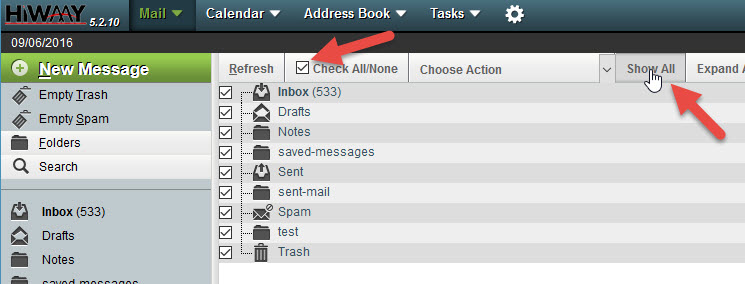
1. Click on the word Folders just under the green New Message button in the upper left.
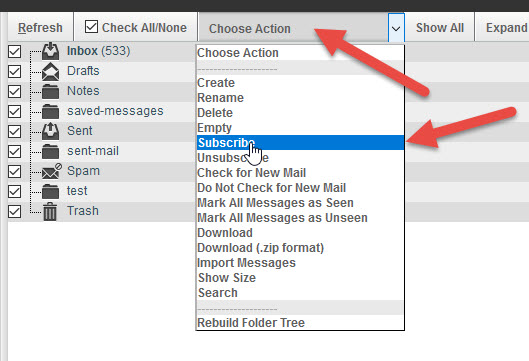
2. The right side of the will now list your folders. Click the Show All button and then check the Check All/None box.
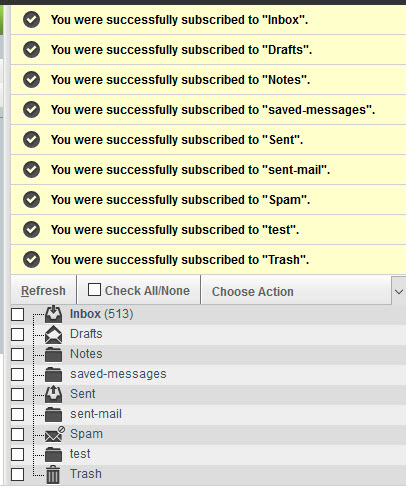
3. Now click the Choose Action button and from the list that appears choose Subscribe.
4. A number of yellow bars will appears indicating that you have subscribed to all your folders. Click your Inbox to make them go away.
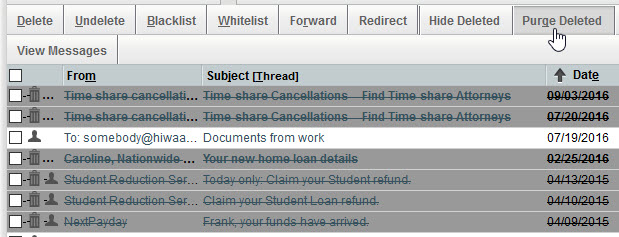
**One of the big changes to the webmail interface is that you can’t use the select all checkbox to choose just the messages displayed on the current page. It will instead select ALL the messages in the current folder. This can lead to you deleting your entire inbox. Here is a safe way to delete several messages at once.
1. With the messages you want to delete displayed on the screen. Click the checkbox to the left of the first message.
2. Now hold down the SHIFT key and click the checkbox next to the last message you want to select and all the message in between will be chosen too.
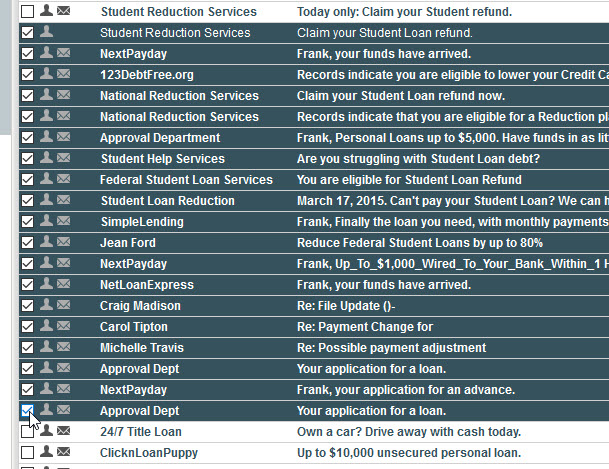
3. Click the Delete button and a line will appear across all the messages selected indicating that they are marked as deleted. If you chose a message by mistake, check its box and click the Undelete button.

4. When you have deleted all the messages you want remove, you must click the Purge Deleted button on the upper right to remove them from the screen and from the server where they are using up space. Purging cannot be undone. Be sure only the messages you want to be purged have lines through them. Look at several pages to make sure.

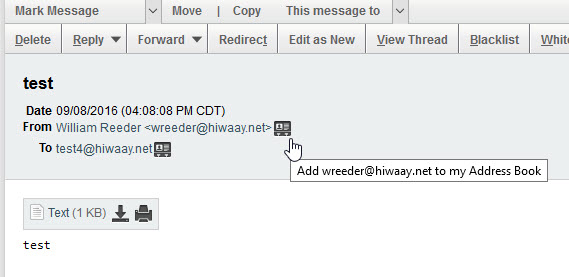
In the old version of webmail when you opened a message to read it, the sender’s address had an icon next to it that allowed you to click on it to add the sender to your address book. For some users, this feature is not enabled by default in the new version of webmail. Here is how to turn it on.
1. If you open a message and the sender’s address looks like this.
2. Click on the gear shaped icon to open the settings menu. Choose Preferences > Mail
3. When the Preferences for Mail screen opens, click on Address Books at the bottom of the Compose column.
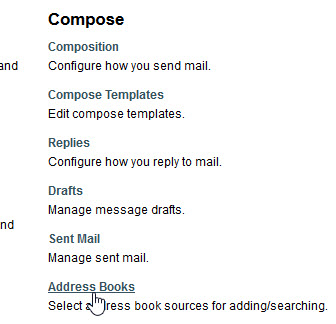
4. You may have more than one address book. Using the dropdown, choose the one to hold the new addresses you are going to add.
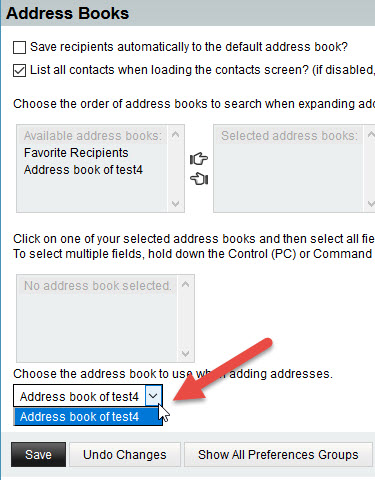
5. Click the Save button. To return to your Inbox, click the green word Mail at the top of the screen.
6. Open a message and you will see a new icon to the right of the sender’s email address. Click it to add the sender to your address book.
1. You may be in the Automatic (Dynamic) mode. Log out using the little orange icon in the upper right that looks like a door with a arrow. Before you log back in. Click on the word Automatic to reveal a dropdown where you can choose Basic. This mode will be very similar to the old webmail interface.
2. Now you should see a Purge Deleted button on the right side of the screen at both the top and the bottom. Clicking it will purge all the messages that have lines through them. ***Be careful as this cannot be undone.***
1. By default, when you delete a message a line get drawn through it and it stays in the same folder. Here is how to change the settings so that deleted messages are automatically moved into the folder of your choice.
2. Click on the icon that looks like a gear to open the settings panel. Choose Preferences > Mail,
3. From the Message column, click on Deleting and Moving Messages.
4. Check the box for Move deleted massages to your Trash mailbox instead of marking them as deleted in the current mailbox? Click the Save button.
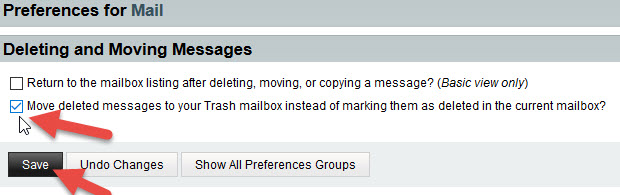
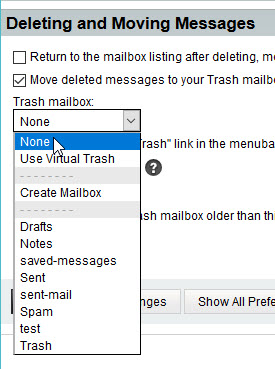
5. More options are now displayed. You have to choose which folder to use as your Trash folder. Click in the dropdown under the Trash mailbox:
It will open a list of your folders. If you see Trash or Deleted Items, choose that folder. Otherwise, click Create Mailbox and give your new mailbox a name like Trash. Then make sure the new mailbox is picked as your Trash Mailbox.
6. Check the Display the “Empty Trash” link in the menubar. This will display a button on the main screen at the upper left under the New Message button that lets you empty the Trash folder with one click.
7. Click Save and click the green word Mail in the top row to return to your inbox.
If you have followed the instructions in the FAQ named “How do I get deleted messages to automatically move to the trash folder?” you can manually purge your files by pressing the Empty Trash button. But you may want to have web mail purge your deleted messages automatically on a schedule. If so, here are the steps.
1. Click on the icon that looks like a gear to open the settings panel. Choose Preferences > Mail,
2. From the Message column, click on Deleting and Moving Messages.
3. In the section labeled Purge Trash how often:, click on the dropdown and choose how often webmail should purge the files in your Trash mailbox.
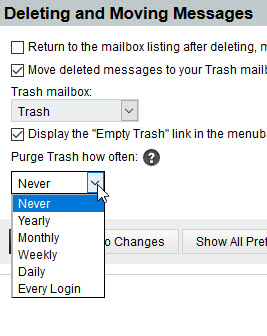
4. Click the Save button.
5. After the settings have been saved, a new box appears with a number. As the text says, you can set how old messages should be in your Trash mailbox before they are purged. Enter a number of days you want to use as the value.
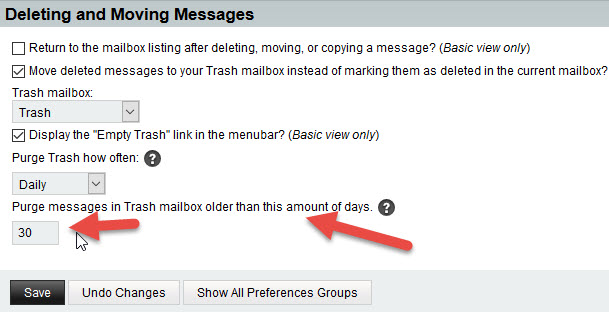
6. Click the Save button and click the green word Mail at the top of the screen to return to your Inbox.
Setting up email for Hosted Domains (@example.com)
To set up Microsoft Office Outlook 2013-2016:
1. Open Microsoft Office Outlook.
2. Click File.
3. Click Add Account
4. Select the checkbox Manually configure server settings or additional server types. Click Next.
5. Select the POP or IMAP option and click Next.
6. Specify the following settings:
Your Name
Your Email Address
Account type. (If you want to keep copies of messages on the server, select the IMAP option. If you do not want to keep any messages on the server, select the POP3 option.)
Incoming mail server. Type your domain name. For example, example.com.
Outgoing mail server (SMTP). Type your domain name. For example, example.com.
Username for logging in to the mailbox. Specify your full e-mail address.
Password for logging in to the mailbox.
7. Click the More Settings button
8. Click the Outgoing Server tab
9. Check the “My outgoing server (SMTP) requires authentication” checkbox
10. Check “use the same settings as your incoming mail server”
11. Click the Advanced tab
12. If you are using POP3 with SSL, click the checkbox and enter 995 as your port. Otherwise leave the default port at 110.
13. If you are using POP3, you may choose when messages are removed from the server
14. If you are using IMAP with SSL, click the checkbox and enter 993 as your port. Otherwise leave the default port at 143.
15. If you are using SMTP with SSL, click the checkbox and enter 465 as your port. Otherwise change the non-default port to 25.
16. Click the OK button
17. Click Next.
18. Click Finish.
To set up Mozilla Thunderbird:
1. Open Mozilla Thunderbird.
2. Go to File > New > Existing Mail Account.
3. Specify the following:
– Your name, as you want it to appear in any messages you send.
– Your e-mail address and password.
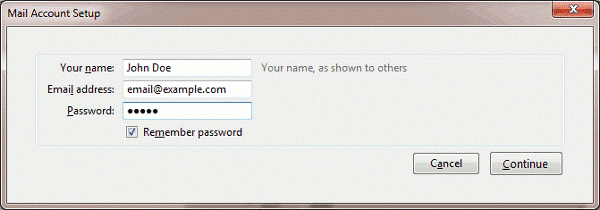
4. Click Continue.
5. If Thunderbird fails to find the settings automatically, specify the following:
– Protocol of your incoming mail server.
– If you want to keep copies of messages on the server, select the IMAP option. If you do not want to keep any messages on the server, select the POP3 option.
– Incoming server address. Specify your website’s Internet address.
– Outgoing server address. Specify your website’s Internet address.
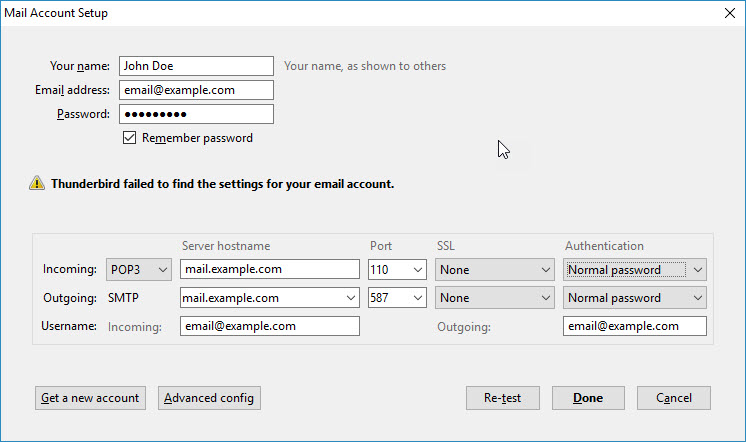
6. Click Create Account.
To set up Apple Mail:
Run Apple Mail. If you run it for the first time and do not have any mail accounts configured in it, skip the next step: Apple Mail will take you directly to creating one.
1. Open the Adding Mail Account wizard:
2. Click Mail Preferences….
3. Select the Accounts tab.
4. Click the + button at the bottom left corner.
5. Enter the account information:
– Your full name
– Your full e-mail address
– The password you use to log in to the Panel.
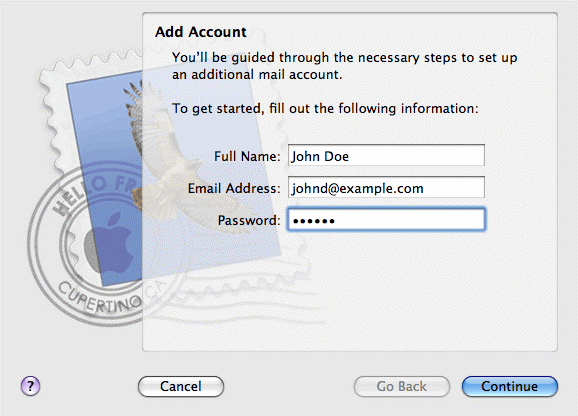
6. Click Continue.
7. Fill in the following incoming mail server information:
– Account Type: select whether you want to use IMAP or POP protocol.
– Incoming Mail Server: type in the name of domain which serves your mail (which follows the @ sign in your e-mail address).
– User Name: enter your full e-mail address.
– Password: leave it auto-completed (Apple Mail takes it from the previous step).
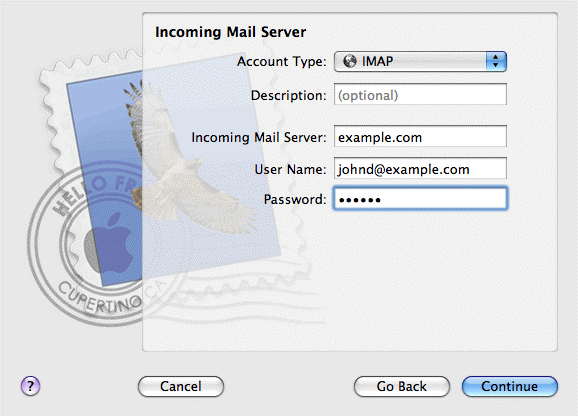
8. Click Continue.
9. (Optional) Specify the incoming mail security options:
10. Select the Use Secure Sockets Layer (SSL) checkbox.
11. Select the authentication method.
12. Keep the default method if you are not sure which to select. (Apple Mail displays this setup screen only if a mail server bundled with Parallels Small Business Panel supports SSL for the selected account type (POP or IMAP)).
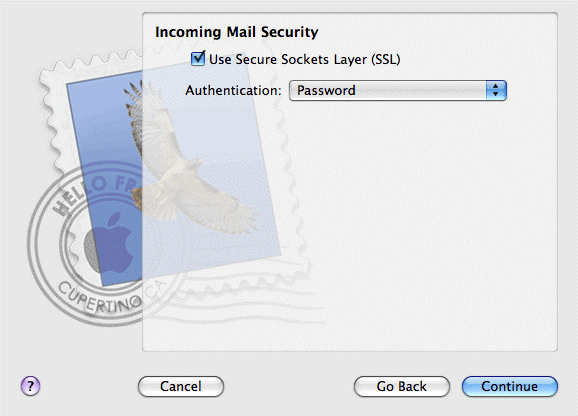
14. Click Continue.
15. Fill in the following outgoing mail server information:
– Outgoing Mail Server: type in the name of domain which serves your mail (which follows the @ sign in your e-mail address).
– Use only this server: selected.
– Use Authentication: selected.
– User Name: enter your full e-mail address.
– Password: leave it auto-completed (Apple Mail takes it from the previous step).
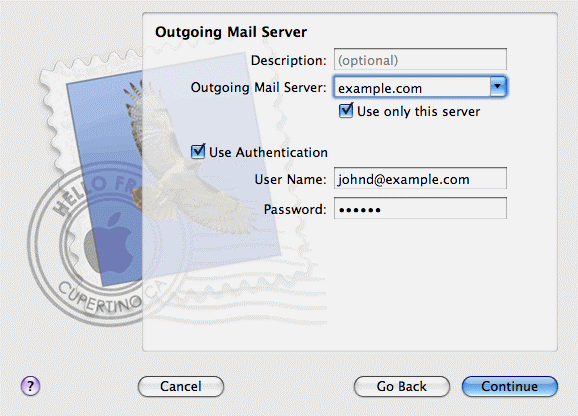
16. Click Continue.
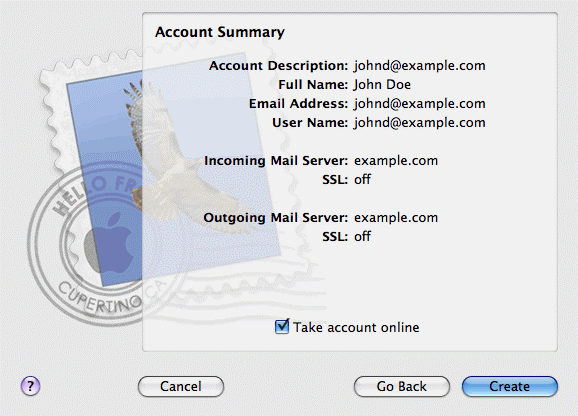
17. Apple Mail displays overall description of the mail account that is going to be created.
18. Select the Take account online checkbox and click Create.
Access your domain email through Webmail
Option 1: In a Web browser, visit the URL webmail.example.com, where example.com is the Internet address of your website. When prompted, specify your full e-mail address as the username (for example, mail@example.com), and specify the password that you use for logging in to the Panel.
Option 2: When logged in to the Plesk Panel, click the Mail tab, and in the list of e-mail addresses, click an icon ![]() corresponding to the e-mail address you need.
corresponding to the e-mail address you need.
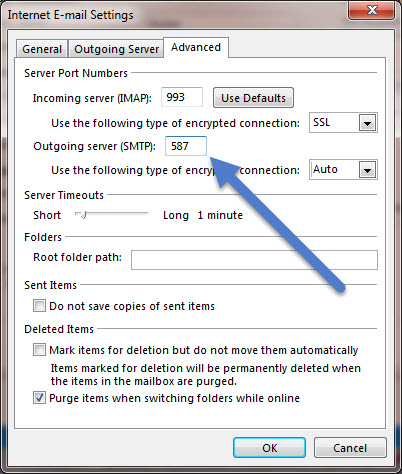
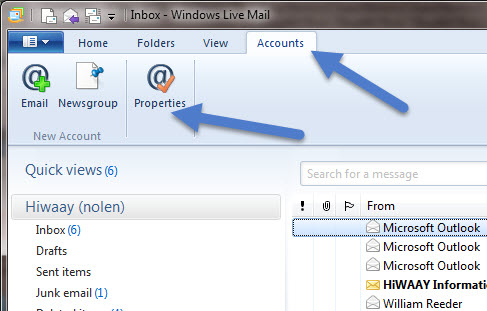
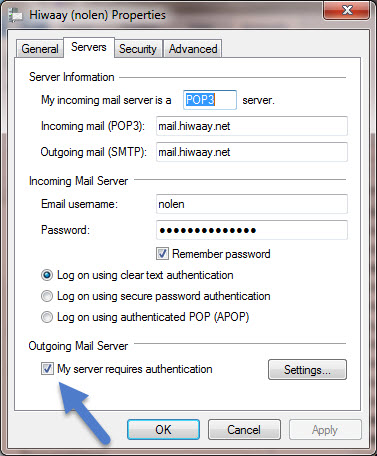
Configuring Email Clients for SMTP Authentication
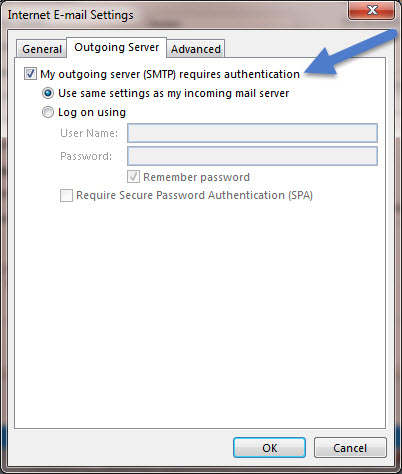
Click OK.
Outlook 2013 is now configured for SMTP Authentication.
Click the ‘Accounts’ tab, then the ‘Properties’ button.
Click over to the ‘Servers’ tab, make sure “My server requires authentication” box is checked.
Then on the ‘Advanced’ tab, make the outgoing port 587.
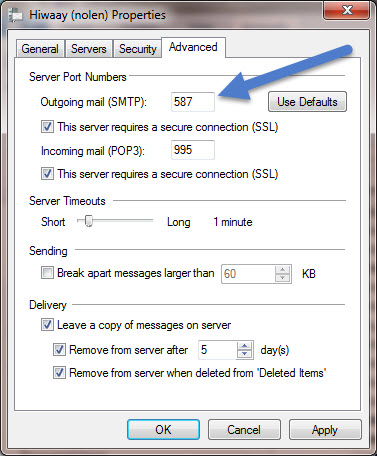
Click OK.
Windows Live Mail is now configured for SMTP Authentication.
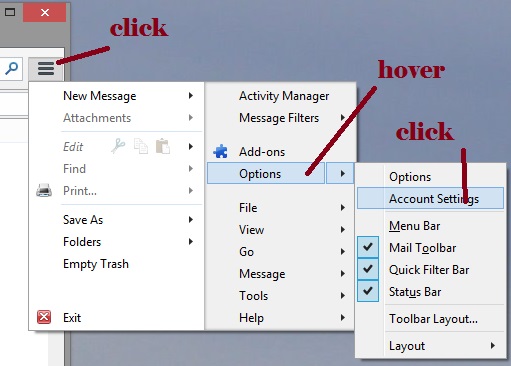
*with toolbar toggled on*
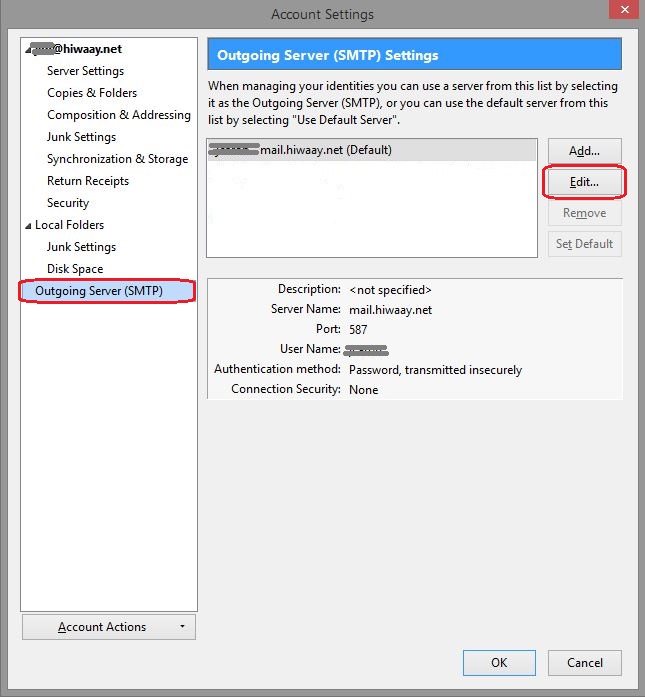
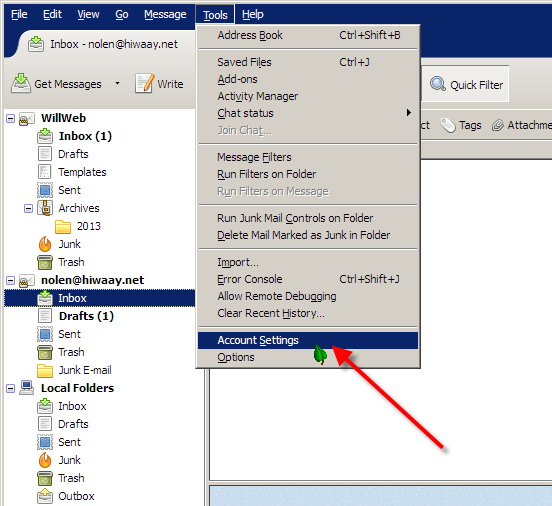
Click ‘Tools’ then ‘Account Settings’.
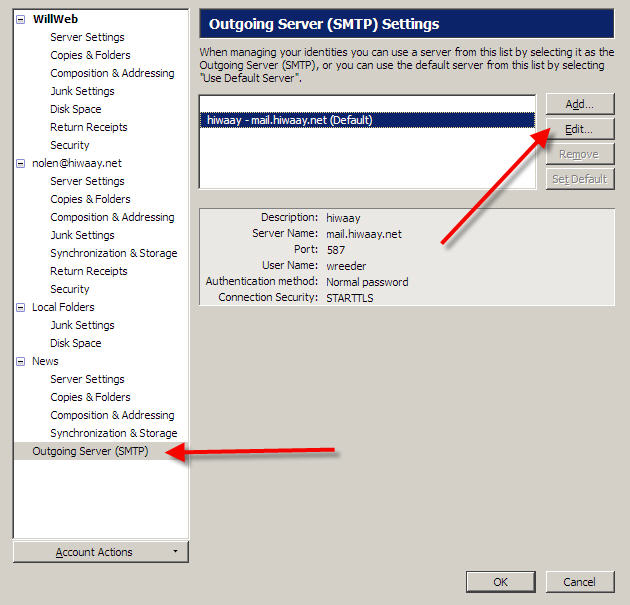
Select ‘Outgoing Server (SMTP) and click the ‘Edit’ button…
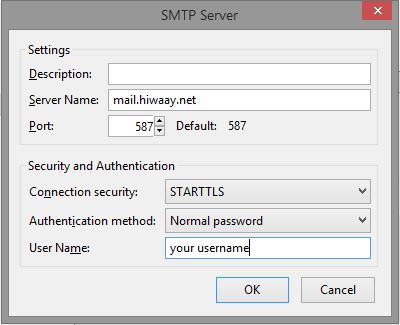
Make the port 587, and authentication method to ‘Normal Password’.
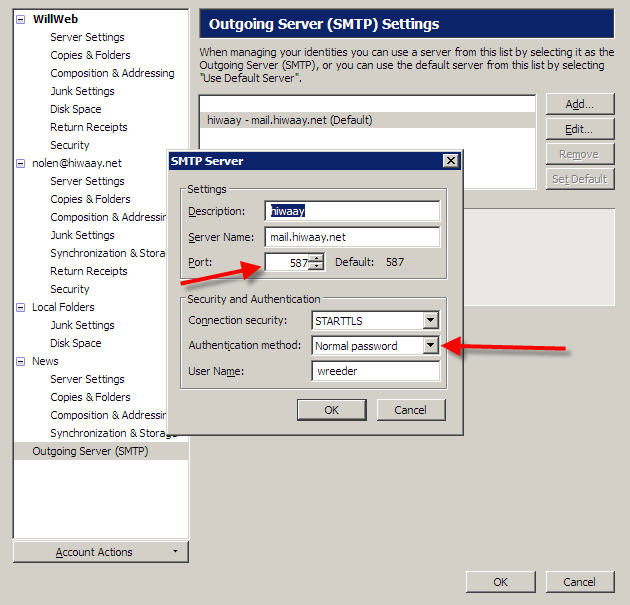
Click ‘OK’.
*OR with toolbar toggled off*